Showing posts with label to. Show all posts
Showing posts with label to. Show all posts
Tips on how to enter recovery mode on Samsung Galaxy Note 2
If you are a Samsung Galaxy Note2 user,keep this Samsung Data Recovery tip,maybe oneday you might need it.
When you need to install official or custom ROMs in your Android devices, or you have a need to wipe the cache, dalvik cache or to have access for other options which help you to customize your Samsung Galaxy Note 2 device, then you should enter in the recovery mode, for make this thing is very easy, only to know the right combination of actual button.

Before teach you how to enter in the recovery mode, you mustassimilateyour consideration that, the recovery mode is an important menu for your device and there, it’s very dangerous if you don’t know what you should to do.
Very generally the recovery mode for Galaxy Note 2 smartphone is used for flash new custom ROM or for backup, there if is installed the CWM (ClockworkMod) installed, then you can easily to install the custom ROMs or to get the backup for your current Rom installed in your device. A complete backup, which is possible from the recovery mode in the Note 2,it is the Nandroid backup; with this tool you can get a full backup for all your data, like the ROM and your personal information, apps, files, documents, contacts. For this kind of backup, you’ll need more than 1 GB free space in your internal device memory. But for installing the CWM you’ll need the root access, and if you’ll root your device the warranty will be void.
These things above mentioned we can begin our tutorial.
How to enter recovery mode on Samsung Galaxy Note 2 smartphone:
* Turn off your Samsung Galaxy Note 2 device.
* After the device is turned off, press the following combination of buttons in the same time:
Volume up + power button + home button, and keep these buttons pressed until the recovery mode will be displayed.
* When you’re in the recovery mode, you can release the buttons.
This is all, now you successfully learnt how to access the recovery mode on Samsung Galaxy Note 2 device.
Another modality to enter in the recovery mode is only for the rooted Galaxy Note devices for some custom’s ROMs, for this method press the power button for a few seconds and then a pop up methods will be displayed. Now, in the menu select the reboot option, there you should see the reboot options: “Normal”, “Recovery”, and “Download “. From there choose the Recovery option and then your device will take a reboot in the recovery mode directly, without any other settings.
Remember to use our comment section for any troublesto understand our tutorial.
Another tip:
Deleted files from Samsung mobile phone by mistake is common to Samsung users, if it happen on you, and you need to recover deleted photos from Samsung galaxy, what should you do? Ha, the answers just in this blog! (Note: turn to "Tutorial: How to Recover Samsung Galaxy" Or "Simple Points To Help You Recover Deleted Pictures From Samsung Galaxy " )
ReadMore detail...
When you need to install official or custom ROMs in your Android devices, or you have a need to wipe the cache, dalvik cache or to have access for other options which help you to customize your Samsung Galaxy Note 2 device, then you should enter in the recovery mode, for make this thing is very easy, only to know the right combination of actual button.

Before teach you how to enter in the recovery mode, you mustassimilateyour consideration that, the recovery mode is an important menu for your device and there, it’s very dangerous if you don’t know what you should to do.
Very generally the recovery mode for Galaxy Note 2 smartphone is used for flash new custom ROM or for backup, there if is installed the CWM (ClockworkMod) installed, then you can easily to install the custom ROMs or to get the backup for your current Rom installed in your device. A complete backup, which is possible from the recovery mode in the Note 2,it is the Nandroid backup; with this tool you can get a full backup for all your data, like the ROM and your personal information, apps, files, documents, contacts. For this kind of backup, you’ll need more than 1 GB free space in your internal device memory. But for installing the CWM you’ll need the root access, and if you’ll root your device the warranty will be void.
These things above mentioned we can begin our tutorial.
How to enter recovery mode on Samsung Galaxy Note 2 smartphone:
* Turn off your Samsung Galaxy Note 2 device.
* After the device is turned off, press the following combination of buttons in the same time:
Volume up + power button + home button, and keep these buttons pressed until the recovery mode will be displayed.
* When you’re in the recovery mode, you can release the buttons.
This is all, now you successfully learnt how to access the recovery mode on Samsung Galaxy Note 2 device.
Another modality to enter in the recovery mode is only for the rooted Galaxy Note devices for some custom’s ROMs, for this method press the power button for a few seconds and then a pop up methods will be displayed. Now, in the menu select the reboot option, there you should see the reboot options: “Normal”, “Recovery”, and “Download “. From there choose the Recovery option and then your device will take a reboot in the recovery mode directly, without any other settings.
Remember to use our comment section for any troublesto understand our tutorial.
Another tip:
Deleted files from Samsung mobile phone by mistake is common to Samsung users, if it happen on you, and you need to recover deleted photos from Samsung galaxy, what should you do? Ha, the answers just in this blog! (Note: turn to "Tutorial: How to Recover Samsung Galaxy" Or "Simple Points To Help You Recover Deleted Pictures From Samsung Galaxy " )

Tutorial How to Recover Samsung Galaxy
The Samsung Galaxy S3 works at 4G LTE which is powered by Android 4.0. Really it is a computer device that definitely makes the life easier. Samsung is one of the pioneer providers of advanced digicam and mobile phones. It gives diverse selection of cameras which is designed with powerful features and stunning qualities. Samsung provides different type of series like DSLR and a lot upgraded technologies. Now a days everyone is choosing Samsung Galaxy model due to its stunning features. This Samsung model is properly designed and allows its users to capture excellent images. But users need to face critical situation whenever they loss their saved pictures.If such a thing happens ,if you have a way to recover samsung galaxy s3 ,Tab,Note,Nexus etc.

Dont panic after you lost the picture files inside your samsung galaxy due to these reasons:
* Accidental formatting of media
* Accidental deletion of picture(s)
* Misuse of memory cards
* Corruption in storage device or computers disc drive
* Utilization of memory drives in a number of computers
Photos, images, photos. Pictures are among the most loved things. It captures an extra of life for long periods then we merely take pictures using our Camera. In the event you lost those memories, dont worry, it will be easy to acquire better lost photos using photo recovery software.
This i will show How you can perform samsung galaxy data recovery
Step A. Download software from http://www.any-data-recovery.com/product/photo-recovery.htm and install on your pc.
Step B. Connect your card with the computer. Open the installed software.
Step C. Find the way youll want to recover photos, " Deleted Recovery" or " Format Recovery" .
Step D. Scan you card, then choose the photos youll need, click "Recover".
Yet another tip
Do not write any data for a samsung galaxy to shield from extreme heat plus order to avoid the results lose.
Learn more:
* how to restore samsung galaxy s3
* how to recover photos on samsung galaxy s
ReadMore detail...

Dont panic after you lost the picture files inside your samsung galaxy due to these reasons:
* Accidental formatting of media
* Accidental deletion of picture(s)
* Misuse of memory cards
* Corruption in storage device or computers disc drive
* Utilization of memory drives in a number of computers
Photos, images, photos. Pictures are among the most loved things. It captures an extra of life for long periods then we merely take pictures using our Camera. In the event you lost those memories, dont worry, it will be easy to acquire better lost photos using photo recovery software.
This i will show How you can perform samsung galaxy data recovery
Step A. Download software from http://www.any-data-recovery.com/product/photo-recovery.htm and install on your pc.
Step B. Connect your card with the computer. Open the installed software.
Step C. Find the way youll want to recover photos, " Deleted Recovery" or " Format Recovery" .
Step D. Scan you card, then choose the photos youll need, click "Recover".
Yet another tip
Do not write any data for a samsung galaxy to shield from extreme heat plus order to avoid the results lose.
* how to restore samsung galaxy s3
* how to recover photos on samsung galaxy s
Remote Desktop App TeamViewer Touch Comes To Windows 8
Remote desktop applications are a great way to diagnose and solve problems on other computers over the internet. Remote access can be of multiple types; some connections allow you to just view the desktop screen, and whatever is happening on it, while others equip you with the ability to control almost all the aspects of a remote computer, letting you access different software, open menus, and perform actions as if you’re physically present in front of it. People who frequently have to deal with complex computer issues can benefit from such solutions by providing remote access to someone who knows how to fix such problems. One of the most famous remote desktop solutions out there is TeamViewer, which is currently available for Windows, Mac, iOS and Android. Using TeamViewer, you can remotely control your computer from any Teamviewer-configured system. Today, TeamViewer has released the preview version of TeamViewer Touch, a Modern UI app that will allow you to remotely control computers from your Windows 8 and Windows 8 RT-powered devices.
In order to get TeamViewer Touch, go to Windows Store, use Win+Q hotkey to bring up Search Charms. Now, type “teamviewer touch” and press enter. From the search results, choose the tile named TeamViewer Touch to open its in-Store page.

Once you are on the main page, you can read its description, checkout user reviews and download the app to your computer. Click the Install button available on the left side to quickly download and install the app to your computer.

When you run the app, you are greeted with a rather simple interface, that allows you to instantly connect to remote computers. If you have a TeamViewer account, you can sign in using your credentials from the right side.In the left side, enter the ID of the remote computer in order to connect and control it. Once you have entered the ID, you will need a password to complete the authentication process.

As soon as you enter the password, it starts establishing a remote connection with the computer. You now have access to every element of the remote system. It lets you gain complete control over the remote computer by allowing you to execute applications and make changes to different system settings.

Right-click inside the app to reveal options for using Ctrl+Alt+Del hotkey, moving the display to Next Monitor (if multiple monitors are connected to the remote computer) and Keyboard (for tablet devices).

Pressing Win + I gives you access to the settings charms from the right side, from where you can open the Event Log to view activities performed during the session.

TeamViewer Touch works on both 32-bit and 64-bit versions of Windows 8. We tested it on Windows 8 64-bit.
How to Uninstall Avira SearchFree Toolbar from your Computer
When you install Avira Free antivirus on your Computer with ‘Express install’ method Avira SearchFree toolbar powered by Ask.com will be installed for Firefox, Chrome and Internet Explorer browsers, Ask.com will be set as default search provider for these and Avira Search will be set as home page also. These are annoying changes Avira Antivirus makes to browsers. Searches performed from these affected browsers will shows search results generated by Ask.com. Let us take a look at how to uninstall this Avira Toolbar from your Computer.

Before proceeding with this toolbar uninstallation let me tell you that Web Protection offered by Avira will be removed with this.
Uninstalling Avira SearchFree Toolbar
1. Close all browsers if any running, open Control Panel>Programs and Features select “Avira Search Free Toolbar plus web protection”
2. Click Uninstall button, when warning is displayed click on Yes button
3. Avira Toolbar and Avira SearchFree Toolbar updater will be uninstalled, you need to restart your Computer for the changes to take effect.

Removing Ask Search engine from Firefox, Chrome and IE browsers
Firefox > Arrow icon>Manage Search Engines, select Ask and click Remove button. More easy method I recommend to you is to use Reset Firefox button from Troubleshooting information page.
Chrome>Settings>Under Search section Manage Search Engines>select Ask and click on Cross icon at the end of it to remove from Chrome.
IE from Tools>Manage Add-ons>Search Providers
Select Ask and click Remove button. You can also easily change home page to desired one.
(Via Techdows)
Best Free App to Backup and Restore Contacts Online For Iphone and Android

Backup Contacts is the first thing that We doing before format/factory reset our Mobile phone . I think Backup Contacts to Cloud storage is more secure and safe than SD Card .. The common way we used to back up contacts in Android and iOS is Gmail Sync. In my Samsung Galaxy S2 ( Android 4.0.4 ) i feel its a bit slow and not so manageable.
After searching a while, I got NQ Contact Sync an easy tool to Backup , Restore and Manage Contact online.
The First thing i like in NQ Contact Sync is its Simple and friendly UI and second thing that help full for us is we can Backup and Restore the same contacts between Android , iOS , Symbian and Blackberry.
According to Developer the Main Capabilities of NQ Contact Sync is:
- Back up your contacts privately and securely to NetQin Space
- Restore contacts directly from your NetQin Space
- Backup contacts to your SD card
- Restore your contacts from the SD card
- Manage your contacts directly through your NetQin Space and automatically sync on all your devices
To Backup Contacts to Cloud and Manage online we need to Register an account at http://i.NQ.com ( Its Fast and Free )
I am not writing the App usage tutorial as it is very simple. just download and install the app from the below links ,In app login with your netqin account and start backup and restore. Also login at http://i.NQ.com to Manage your Contacts.
Download NQ Contact Sync Android | iPhone
How to take screenshot in Android v4 ics ice cream sandwich

Taking screen shot in Android 4.0+ is simple when compared with other android versions. While capturing the animation makes it more fun. I am not sure whether this method works with all android 4.0+ versions, i am tested the method with Galaxy S2 and Nexus S and works great.
Method:
1. Press the volume down button and power button simultaneously for one second,then you will hear a capture sound with animation.
Thats it ! Browse to /sdcard/Pictures/Screenshots for captured images.
Use The Disk Defragmenter Tool To Speed Up Data Access On Your Hard Disk

Utility program used to manage the files and used to tidy up the space on your hard disk, so the operating system can access data faster and easier. When operating system data on the hard disk, storing data in the first available sector on the disk. In this case the data file stored on disk in a dispersed form, referred to as "fragmented files". Fragmentation slows down computer speed data access. You can boost your computer performance by de-fragmenting your hard disk.
In the process of de-fragmentation, data from each file are stored in continuous sectors. There are many third-party software available in the market for this purpose but you can use a program called Disk Defragmenter utility in Windows operating system. To start the Disk Defragmenter tool, first make sure all running programs are closed.
To run the Disk Defragmenter tool, click the Start button, type Run and type dfrg.msc then press ok. Then the Disk Defragmenter window will appear. Select the drive and press the defragmenter. If you have a large hard disk, this process can take several hours. We recommend you do this every 1 (one) month if you want to improve your computer performance.
How to back up iPad iPhone and iPod touch
iCloud and iTunes can back up most data on your iPhone, iPad, or iPod touch.
Backed-up information includes purchased music, TV shows, apps, and books*; photos and video in the Camera Roll; device settings (for example, Phone Favorites, Wallpaper, and Mail, Contacts, Calendar accounts); app data; Home screen and app organization; Messages (iMessage, SMS, and MMS), ringtones, and more. Media files synced from your computer aren’t backed up, but can be restored by syncing with iTunes.
* Backup of purchased music is not available in all countries. Backup of purchased TV shows occurs only in the United States. Previous purchases may not be restored if they are no longer in the iTunes Store, App Store, or iBookstore.
iCloud automatically backs up the most important data on your iOS 5 device. After you have enabled Backup on your iPhone, iPad, or iPod touch in Settings > iCloud > Backup & Storage, it will run on a daily basis as long as your device is:

To learn more about what is backed up, see the iCloud: Backup and Restore Overview article.
How to restore from a backup
When you go through Setup Assistant on a new iOS 5 device, choose "Restore from iCloud Backup" and enter your iCloud account and password. You will see the three most recent backups for each of the devices on which you enabled Backup. Choose from which backup to restore.
 After your device restarts, your settings and accounts are restored and Backup starts downloading your purchased music, TV shows, apps, books, Camera Roll, and other content*. You may be prompted to enter the passwords for all accounts enabled on your device.
A progress bar will appear underneath the apps that are being downloaded. To prioritize the restore of a specific app, tap its icon. Restore will attempt to download the same version of the app that you had installed previously. If that version is no longer available, the latest version of the app will be restored.
To check if the restore is complete, go to Settings > iCloud > Storage & Backup. Complete the setup assistant after erasing your device (by going to Settings > General > Reset > Erase All Content and Settings) or after starting your new device. When prompted to set up as new or to restore from previous backup, choose to restore from iCloud backup. Then enter your AppleID and password.
iTunes can create backups of your iOS device when you:
Use these steps to manually back up your iOS device using iTunes:
iOS device backups preserve your settings, the Camera Roll (or Saved Pictures), and other important data. Learn more about what is stored in a backup.
How to restore from a backup
To restore information from a backup, use one of the following methods after connecting your iOS device to the computer with which you normally sync:
iTunes will not back up automatically if you are using iCloud.
Have a new iOS device and need to move your previous backup onto it? Follow the steps in How to transfer your backup from one iOS device to a new device.
Important: Information about products not manufactured by Apple is provided for information purposes only and does not constitute Apple’s recommendation or endorsement. Please contact the vendor for additional information.
ReadMore detail...
Backed-up information includes purchased music, TV shows, apps, and books*; photos and video in the Camera Roll; device settings (for example, Phone Favorites, Wallpaper, and Mail, Contacts, Calendar accounts); app data; Home screen and app organization; Messages (iMessage, SMS, and MMS), ringtones, and more. Media files synced from your computer aren’t backed up, but can be restored by syncing with iTunes.
* Backup of purchased music is not available in all countries. Backup of purchased TV shows occurs only in the United States. Previous purchases may not be restored if they are no longer in the iTunes Store, App Store, or iBookstore.
iCloud
How to back upiCloud automatically backs up the most important data on your iOS 5 device. After you have enabled Backup on your iPhone, iPad, or iPod touch in Settings > iCloud > Backup & Storage, it will run on a daily basis as long as your device is:
- Connected to the Internet over Wi-Fi
- Connected to a power source
- Screen locked

How to restore from a backup
When you go through Setup Assistant on a new iOS 5 device, choose "Restore from iCloud Backup" and enter your iCloud account and password. You will see the three most recent backups for each of the devices on which you enabled Backup. Choose from which backup to restore.

A progress bar will appear underneath the apps that are being downloaded. To prioritize the restore of a specific app, tap its icon. Restore will attempt to download the same version of the app that you had installed previously. If that version is no longer available, the latest version of the app will be restored.
To check if the restore is complete, go to Settings > iCloud > Storage & Backup. Complete the setup assistant after erasing your device (by going to Settings > General > Reset > Erase All Content and Settings) or after starting your new device. When prompted to set up as new or to restore from previous backup, choose to restore from iCloud backup. Then enter your AppleID and password.
iTunes
How to back upiTunes can create backups of your iOS device when you:
- Sync with iTunes (disabled if you have iCloud backup turned on)
- Right-click (or Control-click) the iOS device in iTunes under Devices and choose Back Up
Use these steps to manually back up your iOS device using iTunes:
- Connect your iOS device to a computer with the latest version of iTunes installed
- Select your iOS device in iTunes under Devices
- Right-click (or Control-click) the device and select Back Up
iOS device backups preserve your settings, the Camera Roll (or Saved Pictures), and other important data. Learn more about what is stored in a backup.
How to restore from a backup
To restore information from a backup, use one of the following methods after connecting your iOS device to the computer with which you normally sync:
- Right-click (or Control-click) the device and choose Restore from Backup
- If you have a new phone, you can connect to iTunes and it will prompt to restore from your backup
Additional Information
iTunes and iOS do not support installing backups of newer versions of iOS onto devices using earlier versions of iOS.iTunes will not back up automatically if you are using iCloud.
Have a new iOS device and need to move your previous backup onto it? Follow the steps in How to transfer your backup from one iOS device to a new device.
Important: Information about products not manufactured by Apple is provided for information purposes only and does not constitute Apple’s recommendation or endorsement. Please contact the vendor for additional information.
How to Backup your iPhone Data Using i FunBox
After updating your jailbreaked iPhone to a new firmware it is always advised to set you phone as a new phone during the first sync after updating and jailbreaking.
This will save you from battery drainage, unexpected reboot, hanging etc. If you set your phone as a new phone you will loose many valuable data like Received SMS, Contacts, Call History, Notes, Calender etc.
To overcome this problem you are advised to manually backup your iPhone data before updating your iPhone to new firmware. The process is very easy all you need is a Jailbreaked iPhone with SSH installed already or use
How to save Contacts Database:
How to backup Notes:

How To back up Photos:
This doesent necesarelly require any SSH. You can just connect your iPhone to the computer and copy your photos:
How to Backup you Pics and Videos:
Mac
IF you prefer SSH , this is what you need to do:
NOTE:
For videos shot with iPhone 3Gs, you need the same path ( correct me if i am wrong )
How to backup Mail:
Email itself doesnt need any backup. Your iPhone or your computer is not the server for your email accounts, so you dont need to worry about loosing your emails accounts. However, you might want to save your email account as you set them up on your iPhone, so you wont need to go to all that process once again.
How to backup videos from 3rd party apps:
Cycorder
ReadMore detail...
This will save you from battery drainage, unexpected reboot, hanging etc. If you set your phone as a new phone you will loose many valuable data like Received SMS, Contacts, Call History, Notes, Calender etc.
To overcome this problem you are advised to manually backup your iPhone data before updating your iPhone to new firmware. The process is very easy all you need is a Jailbreaked iPhone with SSH installed already or use
How to save Contacts Database:
- SSH into the iPhone and go to /private/var/mobile/Library/AddressBook
- you will find 2 files there. save them on your computer.
- SSH to your phone and go to /private/var/mobile/Library/SMS
- Save sms.db on your computer
- SSH into your device and go to /private/var/mobile/Library/Calendar
- Copy Calendar.sqlitedb to your computer
How to backup Notes:
- SSH into your dedvice and go to /private/var/mobile/Library/Notes
- Copy notes.db and notes.idx to your computer
How To back up Photos:
This doesent necesarelly require any SSH. You can just connect your iPhone to the computer and copy your photos:
How to Backup you Pics and Videos:
Mac
- connect iPhone
- open iPhoto and copy your photos
- or use iPhoneExplorer.
- connect iPhone
- open MyComputer
- you will see the iPhone as a new device ( a photo camera ) . Open it and save your photos
IF you prefer SSH , this is what you need to do:
- SSH into your iPhone
- go to /var/mobile/Media/DCIM/
NOTE:
For videos shot with iPhone 3Gs, you need the same path ( correct me if i am wrong )
How to backup Mail:
Email itself doesnt need any backup. Your iPhone or your computer is not the server for your email accounts, so you dont need to worry about loosing your emails accounts. However, you might want to save your email account as you set them up on your iPhone, so you wont need to go to all that process once again.
- ◦SSH into your device
- ◦go to /private/var/mobile/library/ and just copy the folder called “Mail” to your computer
- How to backup Visual Voicemail:
- go to var/mobile/Library/Voicemail/voicemail.db
- Individual voicemails are stored as 1.amr, 2.amr, etc. in the same folder. If you’ve recorded a custom greeting, it’s stored as Greeting.amr.
How to backup videos from 3rd party apps:
Cycorder
- SSH into your device
- go to /private/var/mobile/media/videos
- SSH into your device
- go to /private/var/mobile/media/iphonevideorecorder/
- SSH into your device
- go to /var/mobile/Library/Downloads
- SSH into your iPhone
- go to /var/mobile/Library/CallHistory/
- copy call_history.db to your computer
How To Change Blogger Post URL Using Permalink

Recently Blogger introduced an option named Permalink in Post settings to edit the post URL to your desired one. But its not enabled in Blogger.com , You can access this option by logging in to draft.blogger.com.
Just follow this simple tutorial to edit your blogger post URL to your desired one.
Steps:
Note : If you have Permalink Option in your Blogger Post Settings Start from Step 2.
1. Login to draft.blogger.com with your same Blogger account.Then You will get a Dashboard same as Blogger.com
2. Now open the desired post you want to edit the URL. If the post is a published one click Revert to draft button to enable Permalink editing.

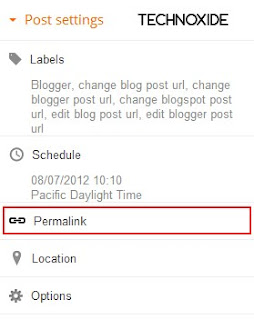
3. Then click Permalink in Post Settings.
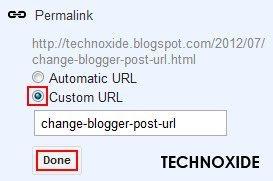
4. Now check the Custom URL radio button and type the new post URL in Custom URL text field. After changing the URL dont forget to click Done!
5. Click Publish .
Thats it ! Now check the post URL it will be changed to the modified one !
Note : If you are changing URL of a old post, please note down the old URL before changing to a new one. Because your old post URL may be submitted to search engine or social websites.So If any one come to your blog using the old URL he will get a 404 not found error. Dont Worry ! you can Redirect your old URL to new URL using Custom Redirects feature of Blogger.
How to Identify Files that don’t have an Extension

When we download files from torrents or other sites, sometimes the downloaded file may not have any extension. So windows cant identify the file type. To open the file we should know the extension.
By Googling you will get many tools to identify the extension and file type. I am sharing a best tool that worked well for me. It is very small in size and very easy to use.
Download TrIDNet and XML Definition here
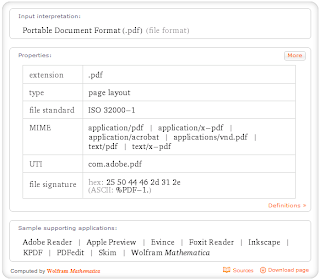
When you get the file extension if you want to know which software is required to preview that file.Just go to WolframAlpha Website and enter the extension with dot.for example if you want to know pdf enter .pdf ,now you will get something like below image.
How To Hard Reset Wave 2 with Lost Password
I am tested it with Samsung Wave 2 on Bada 1.2 and Bada 2.0 and its successfully reset to the default one. It may be work with other Bada OS phones.
* Before hard reset your phone must be charged to a minimum of 60%
Steps:
1. Backup your contacts
2. Remove SIM and Memmory Card
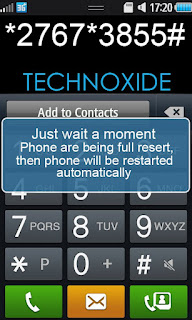
3. Now dial *2767*3855# and wait till the phone reboots.
Thats it ! Done ! Now your phone will be in default state !
VB Net to C Converter 3 01
VBConversions has complete support for VB 2003, 2005, 2008, and 2010 (all project types), including full support for the latest language enhancements, such as Implicit Line Continuation, Multiline Lambdas, Linq, WPF, inline XML, and implicit variable typing. The converter is rigorously tested on millions of lines of code in thousands of real world projects before each release, to ensure that its in tip-top shape to convert your projects accurately.
ReadMore detail...
Whats new in this version: Version 3.0 has fixed error converting some dllimport functions, mismatched casing detection in labels / goto statements, improved case statement conversions.

How to Master facebook Marketing in 10 Days

Ever heard 80-20 rule for sales message vs content? If you never heard you probably missed a lot of online marketing knowledge thus you may oversell or undersell which nobody will like it.
With facebook marketing tips & tricks aside of having fun, you may also get a lot of money because people are there to have fun while in fun they also spend money!
This free marketing ebook will help you to sell your products by knowing first your competitors, research & actions!
With its 800 million users, Facebook has become the world’s meeting place.
But, while everyone knows about Facebook and some small and medium size businesses have taken the first step by creating a business page, many are still challenged by how to maximize Facebook’s potential to build brand loyalty and drive revenues higher.
They know that Fortune 500 firms, like Coca-Cola and McDonald’s, attract millions of Facebook fans, but beyond posting a status update or asking people to Like them on this mother of all social media, they are confused and frustrated as to how to make the most of this 21st Century marketing phenomenon.
Whether it’s Facebook’s complexity or simplicity that has you stymied, if you put in just a little effort— for 10 days—you can boost your Facebook interactions by 10, 20, even 30 percent or more, garnering fans and customers who will spend real money as a result of your social marketing magic.
Contents:
10 DAYS, MORE ENGAGEMENT, MORE SALES
DAY 1: WATCH AND LEARN
DAY 2: UNDERSTAND FACEBOOK BEST PRACTICES
DAY 3: LEARN THE LINGO
DAY 4: ADD TO YOUR PAGE
DAY 5: CREATE A CONTENT CALENDAR
DAY 6: UNDERSTANDING EDGERANK AND THE ART OF ENGAGEMENT
DAY 7: PUT ON A SHOW
DAY 8: AND THE WINNER IS… YOUR BUSINESS
DAY 9: RUN A TARGETED AD CAMPAIGN
DAY 10: GAINING SOME INSIGHTS
FACE FORWARD
How to Speed Up Windows 7 Folder Loading Time

Many people complain that folders take a lot of time to load in Windows 7 (sometimes even more than 10 seconds), especially when the folder size is huge. Now, the question here is, is Windows 7 slow or is it the way you maintain your computer? There is no solid answer to this.
However, there are ways to speed up the loading of folders. We have compiled a list of activities that (if performed) may help in improving the speed. These processes are not foolproof, but yes, they have shown improvements and positive results. So, go ahead and try your luck.
Optimize Folders for Contents
Windows generally optimizes a folder based on the contents in it. However, when the optimization is stated as Documents or General, I have noticed that the time taken to load a folder is comparatively lower. To do that follow these steps:-Step 1: Right-click on the folder in question and choose to launch its Properties.

Step 2: On the Loading Properties window, navigate to Customize tab. Then, check General Items or Documents from the drop down and apply the setting to sub-folders as well.

Rebuild the Index
The indexing of files and folders can get messy over time with the addition and deletion of data. Though Windows manages the change, it could be a good idea to manually rebuild the index when loading of contents is slow. Here’s how to do that.Step 1: Click on Start menu and type index. Select Indexing Options from the list that appears.

Step 2: That will open the Indexing Options window. Click on Advanced and enter the administrator password if prompted to do so.

Step 3: In the Advanced Options dialog box, click the Index Settings tab, and then click Rebuild.

Note: Indexing may take long time to complete. Some views and search results may be incomplete till then.
Organizing Files and Folders
Generally organizing files in a directory and sub-directory structure helps in better optimization and indexing. As a computer user it is a thumb rule to better maintenance.There could be chances that the folders which are loading slowly have shortcuts to some other locations that do not exist anymore or point to invalid path. So, carefully check and confirm that there is nothing of that sort. Else, Windows wastes time in looking for those invalid paths.
Handling Thumbnail Cache
When you have the thumbnail view activated Windows may take time in loading the thumbnail of files and folders. Generally, thumbnails are cached for faster loading but the activity of rebuilding these pictures on change of content makes things bad.Now, you can avoid the thumbnails and the associated time by ensuring that Windows shows icons only and never thumbnails.

Cool Tip: Read our article on Thumbs.db files in Windows to learn more about these thumbnails and the process of viewing icons only.
Besides, you can always change the folder view to List or Details rather than keeping the iconic view. That again helps by reducing the time to load thumbnail pictures.
Conclusion
I have stated these things from experience. They have worked a number of times for me and my friends. There is nothing special about these activities; however, there is no harm in trying them. They may help you get rid of the green bar that keeps floating for minutes.
Tell us if it helps. If you are aware of more methods to do so, let us know.
Top Image Credit: openDemocracy

How to Use PowerPoint Word Excel on iPhone With CloudOn
How to Use PowerPoint, Word, Excel on iPhone With CloudOn:
 For many people, one of the most important features that an iPhone and other iOS devices still lacks is native support for Office documents, namely, Word, Excel and PowerPoint. Surprisingly, Microsoft has announced that it will bring the popular productivity suite to iOS devices sometime next year.
However, there are a few excellent alternatives in the App Store that we have showed you already, like Google Drive and Dropbox. Even so, what these apps offer are more like workarounds and not a direct way to interact with your Office documents.
Thankfully though, CloudOn solves that with an app that allows you to access, create and edit all your Office documents on the go, and does so while integrating with other services so everything is kept up to date.
Here’s is a quick look at how CloudOn works.
Upon opening the app you will be greeted with a short, but useful demo showcasing the app’s most important features. Once within the app, you are presented with your accounts’ panel, where you can access all of your documents from some of the most important online services, including Dropbox, Google Drive, Box and SkyDrive.


Once you start navigating each of the services within the app (Dropbox in this case), you will feel right at home with the interface, since CloudOn follows how files are organized on each of them.


Note: While CloudOn is powerful enough to handle most Office documents, I found it odd that it wouldn’t recognize some simple .TXT files.
Of course, CloudOn is not about opening simple text files, so I immediately tried it out with some quite heavy Excel spreadsheets and Word documents.
Working with spreadsheets on CloudOn turned out to be like walking with shoes among dunes, which means that it was mostly pleasant but with a few annoyances here and there. On the positive side, CloudOn had no trouble opening even the most data-heavy spreadsheets that I threw at it. However, scrolling through them brought memories of some of the worst web apps that I’ve tried on the iPhone. I have an iPhone 4S, which is no slouch but still, navigating through my spreadsheets felt slow.

CloudOn almost instantly makes up for it however, with the variety of editing options that it offers for you to tweak and work with your spreadsheets. It doesn’t offer the full array of Microsoft Excel’s editing tools but what was there worked well and was far more than anyone editing spreadsheets from a smartphone should need.


The experience while working with Word documents was slightly better, with my documents not lagging that much when scrolling through them and with the variety of editing tools offered being on par with what was offered for spreadsheets.


Syncing also worked as expected, with every edit that I made on my documents updating almost instantly on my Dropbox folder.


Besides the normal document editing tools, CloudOn also offers you the ability to create both folders and documents from the ground up, all of which worked without problems in my tests. When working with photo files though, I noticed that not all of them showed well on more than one occasion, which must surely be caused due to a glitch or bug in the app that needs fixing.

One last important feature that I almost forgot to mention about CloudOn is its Recent Files option, which shows the most recent files you’ve worked with, saving lots of time that would otherwise be spent browsing and searching for them.

Via Guidingtech
How to Use PowerPoint, Word, Excel on iPhone With CloudOn
- Tweet
For many people, one of the most important features that an iPhone and other iOS devices still lacks is native support for Office documents, namely, Word, Excel and PowerPoint. Surprisingly, Microsoft has announced that it will bring the popular productivity suite to iOS devices sometime next year.However, there are a few excellent alternatives in the App Store that we have showed you already, like Google Drive and Dropbox. Even so, what these apps offer are more like workarounds and not a direct way to interact with your Office documents.
Thankfully though, CloudOn solves that with an app that allows you to access, create and edit all your Office documents on the go, and does so while integrating with other services so everything is kept up to date.
Here’s is a quick look at how CloudOn works.
Upon opening the app you will be greeted with a short, but useful demo showcasing the app’s most important features. Once within the app, you are presented with your accounts’ panel, where you can access all of your documents from some of the most important online services, including Dropbox, Google Drive, Box and SkyDrive.
Once you start navigating each of the services within the app (Dropbox in this case), you will feel right at home with the interface, since CloudOn follows how files are organized on each of them.
Note: While CloudOn is powerful enough to handle most Office documents, I found it odd that it wouldn’t recognize some simple .TXT files.
Of course, CloudOn is not about opening simple text files, so I immediately tried it out with some quite heavy Excel spreadsheets and Word documents.
Working with spreadsheets on CloudOn turned out to be like walking with shoes among dunes, which means that it was mostly pleasant but with a few annoyances here and there. On the positive side, CloudOn had no trouble opening even the most data-heavy spreadsheets that I threw at it. However, scrolling through them brought memories of some of the worst web apps that I’ve tried on the iPhone. I have an iPhone 4S, which is no slouch but still, navigating through my spreadsheets felt slow.
CloudOn almost instantly makes up for it however, with the variety of editing options that it offers for you to tweak and work with your spreadsheets. It doesn’t offer the full array of Microsoft Excel’s editing tools but what was there worked well and was far more than anyone editing spreadsheets from a smartphone should need.
The experience while working with Word documents was slightly better, with my documents not lagging that much when scrolling through them and with the variety of editing tools offered being on par with what was offered for spreadsheets.
Syncing also worked as expected, with every edit that I made on my documents updating almost instantly on my Dropbox folder.
Besides the normal document editing tools, CloudOn also offers you the ability to create both folders and documents from the ground up, all of which worked without problems in my tests. When working with photo files though, I noticed that not all of them showed well on more than one occasion, which must surely be caused due to a glitch or bug in the app that needs fixing.
One last important feature that I almost forgot to mention about CloudOn is its Recent Files option, which shows the most recent files you’ve worked with, saving lots of time that would otherwise be spent browsing and searching for them.
Conclusions
It is true that in less than a year Microsoft will finally offer a set of native iOS Office apps, yet in my case I really don’t see the need for them. Office has become a tool needed mostly by companies and by those who create complex documents. For everyone else, options like CloudOn (and other inexpensive productivity tools on the App Store) offer great functionality for free.Via Guidingtech
Subscribe to:
Posts (Atom)