Showing posts with label in. Show all posts
Showing posts with label in. Show all posts
Nokia Lumia 928 for Verizon goes official xenon flash in tow
Everyone thought that Nokia will announce the Lumia 928 at the May 14 event – well, it wont, the official announcement just occured. The phone is exclusive to Verizon and as expected is a beefed up version of the Lumia 920.

The Nokia Lumia 928 packs an 8.7MP image sensor that is optically stabilized and sits behind a 26mm wide-angle Carl Zeiss lens with F/2.0 aperture. Unlike the 920, the new model packs Xenon flash alongside the standard LED flash. Its quite impressive, considering that the Lumia 928 is just 0.5mm thicker than the Lumia 920.
The Nokia Lumia 928 can capture 1080p video at 30fps and record sounds as loud as 140dB thanks to its HAAC wide dynamic range microphones.
The screen is different too – its still 4.5" in diagonal with 768 x 1,280 pixels resolution, but its an AMOLED display with ClearBlack and a High Brightness mode for up to 500 nits of brightness. Its still super sensitive and works with fingernails and gloves.
Other than that, the Lumia 928 is not too different from AT&Ts Lumia 920 – it runs Windows Phone 8 on a 1.5GHz dual-core Krait processor with 1GB of RAM, packs 32GB of built-in memory and a 2,000mAh battery.
On the connectivity side theres Verizons fast 4G LTE along with dual-band Wi-Fi a/b/g/n, Bluetooth 4.0 and NFC. The phone supports wireless charging too.


Nokia Lumia 928 official images
The phone will, of course, come with exclusive Nokia goodies like HERE Drive+ worldwide SatNav, Nokia Music, Transit, City Lens and more.
The Nokia Lumia 928 will be available May 16 from Verizon for $100 after a $50 mail-in rebate on a 2-year contract. For a limited time youll also get a $25 voucher for the Windows Marketplace. There will be two color versions at launch – Black and White.
Source

Android in Apr 2013 JB overtakes ICS Gingerbread still rules
Google unveiled the latest numbers showing the adoption of the various Android versions in the past month (April 2013). This report is the first to use the new, more realistic metric. It keeps track of how many users manually visited the Play Store. Previous scores were calculated based on how many devices connected to a Google server (even automatically, behind the scenes).
So, it’s not quite clear how much of the changes in distribution are due to the new metric and how much due to users actually upgrading their phones.

One thing is clear though - Gingerbread is here to stay - the OS that debuted in the end of 2010 still had the majority share this April (it fell 1.3 percentage points).
Meanwhile, Jelly Bean (4.1 and 4.2 branches combined) overtook Ice Cream Sandwich (4.0). Very few users are on 4.2 and ICS users still outnumber 4.1 users, but both combined account for a larger user base than that of ICS. Also, 4.1 got more new users (it’s up 3.1 percentage points) than 4.2 (up 0.3 percentage points).
Ice Cream Sandwich, Android 4.0, which actually grew in market share in March is down 1.8 percentage points in April. Perhaps thats due to the introduction of the new metric.
Confused about the differences between Android versions? Check out our detailed rundown here.
Source
Set Reminders For Unreplied Emails In Gmail With Notifus For Chrome
Emails are one of the first things we attend to when we start work in the morning, but reading all the new emails for the day isn’t the only thing one has to do; answering emails and following up on previous ones is important too, and that’s often difficult because there’s always so much to follow up on. Notifus is a Chrome extension that acts as an alarm clock for unanswered emails. When you compose an important email or one intended for someone who is highly unlikely to get back to you on time without sufficient nagging, you set a reminder for the email. The alarm can be set for a minimum of 1 day and a maximum of any number of days. Repeat reminders can be set at the time of sending the email as well.
Notifus adds six buttons to the Compose email view, one each for setting a reminder for 1-6 days and one for adding a custom number of days. The buttons act as send buttons too, so click them only after you have composed, proofread and added attachments to your message. To set repeated alerts, click the “Send & 1D” button. The alerts notify you if the email hasn’t been replied to at the end of the time you’ve set, i.e., if you email someone on December 24, 2012, and set a two day alert, the extension will notify you of the pending reply on December 26, 2012. If you’ve already received a reply, the alert will deactivate on its own.

The first time you use Notifus, you will be asked to authenticate your account and create a password for it. It takes less than a minute, since your email address is already there.

Once set, Notifus shows a timer when a message is open. You can remove the alert you’ve set by clicking the cross that appears next to it.

Notifus is useful but needs improvement. At present, alerts and timers show up only when you have a particular message open, and not when you are in the inbox view. The logic behind it that you shouldn’t have to worry about these messages since even if you archive them, the alerts will actively keep track of them. Despite that, some users might prefer to have a cursory look at how many of their emails have not been unanswered. The alert is a good backup in case you forget about an email, but knowing just which tasks are still pending would be a huge help. The alerts can only be set in number of days; adding support for specifying the time would also be great. Overall, Notifus is good to have around as a safety net. Do note that it currently does not work on the new Gmail compose view.
Install Notifus For Chrome
Notifus adds six buttons to the Compose email view, one each for setting a reminder for 1-6 days and one for adding a custom number of days. The buttons act as send buttons too, so click them only after you have composed, proofread and added attachments to your message. To set repeated alerts, click the “Send & 1D” button. The alerts notify you if the email hasn’t been replied to at the end of the time you’ve set, i.e., if you email someone on December 24, 2012, and set a two day alert, the extension will notify you of the pending reply on December 26, 2012. If you’ve already received a reply, the alert will deactivate on its own.
The first time you use Notifus, you will be asked to authenticate your account and create a password for it. It takes less than a minute, since your email address is already there.
Once set, Notifus shows a timer when a message is open. You can remove the alert you’ve set by clicking the cross that appears next to it.
Notifus is useful but needs improvement. At present, alerts and timers show up only when you have a particular message open, and not when you are in the inbox view. The logic behind it that you shouldn’t have to worry about these messages since even if you archive them, the alerts will actively keep track of them. Despite that, some users might prefer to have a cursory look at how many of their emails have not been unanswered. The alert is a good backup in case you forget about an email, but knowing just which tasks are still pending would be a huge help. The alerts can only be set in number of days; adding support for specifying the time would also be great. Overall, Notifus is good to have around as a safety net. Do note that it currently does not work on the new Gmail compose view.
Install Notifus For Chrome
How to take screenshot in Android v4 ics ice cream sandwich

Taking screen shot in Android 4.0+ is simple when compared with other android versions. While capturing the animation makes it more fun. I am not sure whether this method works with all android 4.0+ versions, i am tested the method with Galaxy S2 and Nexus S and works great.
Method:
1. Press the volume down button and power button simultaneously for one second,then you will hear a capture sound with animation.
Thats it ! Browse to /sdcard/Pictures/Screenshots for captured images.
Take Screen Shot in Samsung Galaxy Ace Without Root
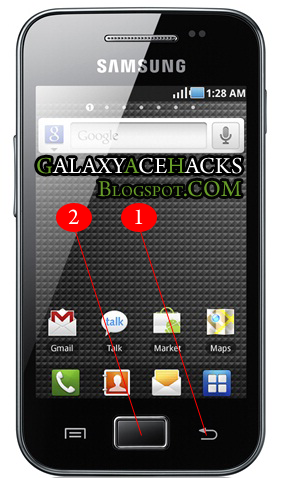
Capturing screen in Samsung Galaxy ace is so simple and achive this without using any third party application. To work this trick OS version Should be Android 2.3 GingerBread. If your OS version is 2.2 then upgrade it free.. if you have allready 2.3 then try it.
1. First press and hold the backbutton in your phone.
(marked in picure as 1)
2. Now Click your Home button and relese....
(marked in picture as 2)
If you here a capture sound and see a capture transition..Done...!!!
Now Goto your SD Card using any File browser ...will get a folder named "ScreenCapture" containing captured picture.
below is the picture captured using my Galaxy Ace GT-S5830 Android 2.3.4 GingerBread
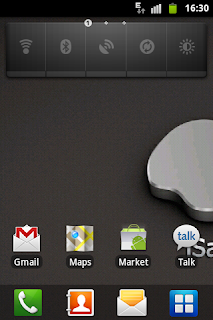
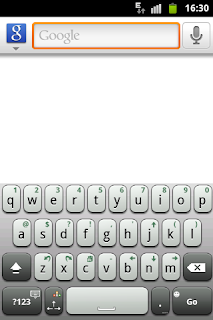
I am tested it with Galaxy ace v 2.3.4 and worked for me.
If this helped you please do a comment....if know any other way please share by comment.
Sync Open Tabs Across Devices in Chrome
Google Chrome has a nice feature where you can sync all your open tabs across all your devices. Anywhere you can install Chrome, you can set it up so that you can see all the other open tabs on all your other Chrome installs.
It’s a very slick feature and works really well. I’ve been using it on my Windows 7 PC, MacBook Pro, iPhone and iPad and it’s been great. It’s so useful when I’m browsing at home and then have to leave to go somewhere and I can just pull up the tabs on my iPhone.
The process is pretty easy and to get started, you need to open Chrome and click on the Wrench icon. Click on Settings.

Here, you want to sign into Chrome using your Google account. Once you have done so, you can click on the Advanced sync settings button.

Here is where you choose what you want to sync.

You can choose to Sync everything, which includes open tabs or you can click on Choose what you want to sync and check the boxes manually.
That’s about it. now all you have to do is install Chrome on your other devices, go to Settings and sign into Chrome. Make sure that you have syncing turned on for the other devices as well.
When you open a new tab in Chrome, you’ll see an option called Other devices. Click on that and you’ll see all the open tabs on your other devices!

The only issue I have seen is that sometimes it takes a while for the tabs to sync. Unfortunately, as of now, there is no way to manually refresh the list of open tabs on other devices. Hopefully, that’ll be something you can do in the future. Enjoy!
How to Master facebook Marketing in 10 Days

Ever heard 80-20 rule for sales message vs content? If you never heard you probably missed a lot of online marketing knowledge thus you may oversell or undersell which nobody will like it.
With facebook marketing tips & tricks aside of having fun, you may also get a lot of money because people are there to have fun while in fun they also spend money!
This free marketing ebook will help you to sell your products by knowing first your competitors, research & actions!
With its 800 million users, Facebook has become the world’s meeting place.
But, while everyone knows about Facebook and some small and medium size businesses have taken the first step by creating a business page, many are still challenged by how to maximize Facebook’s potential to build brand loyalty and drive revenues higher.
They know that Fortune 500 firms, like Coca-Cola and McDonald’s, attract millions of Facebook fans, but beyond posting a status update or asking people to Like them on this mother of all social media, they are confused and frustrated as to how to make the most of this 21st Century marketing phenomenon.
Whether it’s Facebook’s complexity or simplicity that has you stymied, if you put in just a little effort— for 10 days—you can boost your Facebook interactions by 10, 20, even 30 percent or more, garnering fans and customers who will spend real money as a result of your social marketing magic.
Contents:
10 DAYS, MORE ENGAGEMENT, MORE SALES
DAY 1: WATCH AND LEARN
DAY 2: UNDERSTAND FACEBOOK BEST PRACTICES
DAY 3: LEARN THE LINGO
DAY 4: ADD TO YOUR PAGE
DAY 5: CREATE A CONTENT CALENDAR
DAY 6: UNDERSTANDING EDGERANK AND THE ART OF ENGAGEMENT
DAY 7: PUT ON A SHOW
DAY 8: AND THE WINNER IS… YOUR BUSINESS
DAY 9: RUN A TARGETED AD CAMPAIGN
DAY 10: GAINING SOME INSIGHTS
FACE FORWARD
Find The Email An Attachment Was Saved From In Mac OS X Mail
A common problem with a bulky inbox is finding emails. Almost every email service and client has a search feature, with some offering very smart parameters for refining the search (like Gmail’s web interface) but still, at times quickly finding the right email can be a pain. Similarly, if you’ve downloaded an attachment that came with an email and are trying to trace it back to the original message, you could be out of luck if you have renamed the file in the meantime, and will likely need to go through several emails individually to find it since for the most part, you are relying on memory to remember who the email was from, or a snippet from the email’s subject. If you’re using the default Mail app on a Mac, though, finding the email that an attachment came with is much easier than you know, as every attachment that you download saves details of where the file originated from i.e. the email’s sender and subject. You can use this to find the original email thread.
Right-click an attachment and select the ‘Get Info’ option. Scroll down and expand the ‘More info’ tab. Here, you will see where this file came from. An email address followed by the subject indicates that file originated from the Mail program, and this information can be used to search for the email using Mail’s own search feature. This information is preserved even after you have edited the file after downloading it.

Should the search return too many results (or none at all) and you need to get to the email fast, the script that follows the email and subject in the file’s info box is bound to help. Just copy the text you see after the subject – in this case, the “message:%3CCA+f2sof-s3fHyvt_6woCCR0gAUJKs9RofyTA=VzHqNouJwjT6g@mail.gmail.com%3E” part (without the quotes). Next, paste it into Safari’s address bar (no other browser will work), and hit enter. Safari will automatically open the exact email for you.

This tip is useful so long as the email you’re looking for had a file attached and you saved it to your Mac HD. By saving an attachment, we don’t mean the default backup that Mail makes; you can’t browse the files in that folder because the backups that Mail makes are in MBOX format and can be opened with an email client only. You have to download the attachment in its original format and then access its information window. Although this limits the usability of this trick, it still makes the process of tracking down the email that a document came attached with, considerably easier than using Safari or Mail’s search feature for the purpose.
[via Mac OS X Hints]
Advertisement
Right-click an attachment and select the ‘Get Info’ option. Scroll down and expand the ‘More info’ tab. Here, you will see where this file came from. An email address followed by the subject indicates that file originated from the Mail program, and this information can be used to search for the email using Mail’s own search feature. This information is preserved even after you have edited the file after downloading it.
Should the search return too many results (or none at all) and you need to get to the email fast, the script that follows the email and subject in the file’s info box is bound to help. Just copy the text you see after the subject – in this case, the “message:%3CCA+f2sof-s3fHyvt_6woCCR0gAUJKs9RofyTA=VzHqNouJwjT6g@mail.gmail.com%3E” part (without the quotes). Next, paste it into Safari’s address bar (no other browser will work), and hit enter. Safari will automatically open the exact email for you.
This tip is useful so long as the email you’re looking for had a file attached and you saved it to your Mac HD. By saving an attachment, we don’t mean the default backup that Mail makes; you can’t browse the files in that folder because the backups that Mail makes are in MBOX format and can be opened with an email client only. You have to download the attachment in its original format and then access its information window. Although this limits the usability of this trick, it still makes the process of tracking down the email that a document came attached with, considerably easier than using Safari or Mail’s search feature for the purpose.
[via Mac OS X Hints]
Advertisement

How to Prevent Users from Uninstalling Apps from Start Screen in Windows 8
The Windows 8 start screen is probably one of the most important feature and there are many other features linked to it. One of the feature is the ability to uninstall metro apps easily from the start screen. Metro apps are the ones which are installed from Windows Store. But if your PC is used by other users, you might probably want to prevent others from uninstalling apps you have installed on your Windows 8. Although there is an option to prevent this using Group policy, this option is not available in all versions of Windows 8.
So in such cases, it is best to prevent uninstalling using the registry hack. Please note that, this trick involves editing the registry of Windows, do not attempt it if you are not sure on modifying registry. Also, take a backupof registry before editing it.
Open the registry using the Run command (Win + R) and type regedit and press enter. Now navigate to this key,HKEY_CURRENT_USERSoftwarePoliciesMicrosoftWindows
In the next step, you need to create a new Key Explorer under the Windows.

Now select this new key and create a new DWORD value NoUninstallFromStart under the Explorer key.

Enter the value for NoUninstallFromStart as 1. Now close the registry editor and log off Windows 8. Log in back and you can see the option to uninstall is removed from Windows 8.
So in such cases, it is best to prevent uninstalling using the registry hack. Please note that, this trick involves editing the registry of Windows, do not attempt it if you are not sure on modifying registry. Also, take a backupof registry before editing it.
Open the registry using the Run command (Win + R) and type regedit and press enter. Now navigate to this key,HKEY_CURRENT_USERSoftwarePoliciesMicrosoftWindows
In the next step, you need to create a new Key Explorer under the Windows.
Now select this new key and create a new DWORD value NoUninstallFromStart under the Explorer key.
Enter the value for NoUninstallFromStart as 1. Now close the registry editor and log off Windows 8. Log in back and you can see the option to uninstall is removed from Windows 8.
Pin Anything To Taskbar In Windows 8 With Taskbar Pinner
Here, is a simple tutorial that will able you to pin anything to taskbar in Windows 8. In this tutorial we will be using a tool called Taskbar Pinner to achieve this. This is a simple tool by the guys at Winaero that will enable you to pin anything to the taskbar in Windows 8 with real ease. This tutorial will also be for Windows 7.

So follow the steps below and pin anything to the taskbar in Windows 8.
Steps to use Taskbar Pinner and pin anything to the taskbar in Windows 8:
- The first thing that we are supposed to do here is download the Taskbar Pinner for Windows 8. To do so click on this link which will redirect your browser to the download page of Taskbar Pinner.
- This will download a zipped file. Unzip that file. Now you will have the folder as shown in the screenshot below. As described above in the introduction, this application works both for Windows 7 and Windows 8. So just use the version of the program according to the version of the OS that you are using.
- Now just double-click on the program to run it, there is no need to install it. After you have the program running, you will have the interface as shown in the screenshot below.
- This simple and easy to use interface allows you to pin files, folders, shell location, or library to the taskbar in Windows 8. To pin something just click on the appropriate button from interface and you will be presented with the dialog box from where you can select the thing that you want to pin to the taskbar in Windows 8.
- As an example I am going to pin a shell location for the options. To do so just click on the Pin a shell Location button as pointed out in the screenshot, now you will be presented with the set of option as shown below. Just select whatever you like and it will be pinned to the taskbar in Windows 8. In this manner you can pin anything to the taskbar in Windows 8.
- One of the best feature that I like about this is the ability to integrate with the explorer context menu as shown in the screenshot below. In this manner you can pin anything that you come across with just a few clicks with Taskbar Pinner. To turn on this feature just put a checkmark on the applications interface as shown below.


In this manner you can control and customize things pinned to your taskbar with simplicity.
Integrate Dropbox SkyDrive Google Drive Box and SugarSync in Windows 8
Windows 8 which was released last year is missing in many official apps like Google Drive, although Dropbox was released few days back. With cloud storage services now becoming extremely popular and offering sync on various devices, you might have accounts with different cloud storage services. It would always be great to have all the cloud storage integrated into one app and this is exactly what Cumulo does.
Cumulo is a new Windows 8 app with metro UI and integrates all the cloud storage services into one app. You can access Dropbox, SkyDrive, Google Drive, Box and SugarSync in the app.

Once you install the app, you can start connecting your favorite services. If you are using the free app, SugarSync and Box cannot be connected. Once connected, you can view the files and folders available in all the connected services.

There is also an integrated search available in the app from the Charms menu. You can view files in different modes including slideshow. If you have media files in the cloud services, you can stream them to your PC using this app.

Features
- Integrates DropBox, SkyDrive, Google Drive, Box and SugarSync into a unified view
- Uses the search charm to search acrross all your cloud storages
- Provides a transfer manager to download and upload files to all registered storages
- Uses descriptive icons to identify the cloud storage service for files or folders
- A folder that appears in more than one cloud storage service is unified into just one folder
- Allows to share files using the sharing charm
- Play video and audio files directly from the application
- Combine photos from different providers and view them in a slideshow
- Open a file using the browser
- Combine storages and see them as one big storage on the cloud
- Take photos and videos directly from the app and upload them to any provider
Download Cumulo
Via Nirmaltv
How To Embed Files Inside Other Files Using Steganography in Windows

Do you have documents or pictures that you don’t want anyone else to find? Read on to find out how you can embed your important files inside of other files so that nobody will ever know that they existed, except you of course.
Hiding Data
Head over to the EmbeddedSW website and grab yourself a copy of OpenPuff.

Once it has downloaded, extract and launch it, then hit the hide button.

The first thing you will need to do is enter 3 unique passwords.

Now you can select the file you want to hide.

Finally you will need to add one or more Carriers, these are the files that you want to hide your file inside of.

Then go ahead and click the Hide Data button, you will be prompted for where you would like to save the new file.

Extracting Your Files
Once your files are hidden, you will probably want to get them back at some point, to do this, again launch OpenPuff this time click unhide.
Then put in the passwords you used to hide the file.

Now you will need to specify your Carrier, if you used more than one make sure that you add all of them in the correct order.

Then click the unhide button and select a location to save your hidden file.

Once completed you will be given a report which will tell you the name of the file that was hidden.

That’s all there is to it.
Use Multiple Google Accounts in Chrome Web Browser
I have always found it annoying having to use multiple browsers to sign into several Google accounts. I’ve also found it annoying that I had to install add-ons and extensions in browsers like Firefox to get it to work properly.
Personally, I like to use Google Chrome and none of the other browsers. In every other browser, you have to install some kind of add-on or extension to sign into multiple Google accounts in the same browser. Luckily, with recent versions of Google Chrome, this is now a built in feature!
I have no idea when it was released, but I just found it while playing around in the settings for Chrome. In this article, I’ll walk you through the steps to set it up and show you how it works.
Using Chrome with Multiple Users
To get started, click on the Wrench icon and then click on Settings.

Now click on Add new user at the bottom under Users.

It’ll pop up a new instance of Google Chrome and ask you to sign in:

Once you enter your email and password, you’ll see it says you are now signed into Chrome. You’ll also notice another big change: a big icon sitting at the top right of your browser window:

When you click on it, you can see the list of users. Now in Chrome on PC, the icon shows up at the far left instead of the far right. When you click on the icon, you’ll see a list of users. By default, if you haven’t customized anything, it’ll call the original user First user and it’ll just create a random name for the second user, Sneaky or AgentX or some other random name.
If you go back to Settings in Chrome, click on the (Current) user and then click on the Edit button.

Now you can give the user a more practical name and also choose a different icon from their small selection.

In order to edit the other user, you have to switch to that user using the icon at the top of the browser window. Then go to Settings and then click Edit again. Here are my two users setup after the customizations:


It works great and you can sign into multiple Google accounts at the same time. The only downside currently that I see is that it opens the new user in a new Chrome window. It would be nice if they could somehow get it to work so that you could open a different user account in a separate tab in the same window! But other than that, it’s way easier than installing add-ons and logging in multiple times, etc, etc. Enjoy!
Subscribe to:
Posts (Atom)