Showing posts with label with. Show all posts
Showing posts with label with. Show all posts
Neox Screen Is A Great Screenshot Tool With Several Upload Options Unique Capture Modes
Neox Screen Is A Great Screenshot Tool With Several Upload Options & Unique Capture Modes:

ReadMore detail...
While Windows offers its own screenshot utility in form of Snipping Tool, the features it offers are simply not enough for the needs of bloggers and power users who need good quality screenshots often. We have seen countless third party screenshot tools that attempt to differentiate themselves from each other by offering different capturing modes, output formats, editing options and file saving functionality. Recently, we covered EzSnap that let you quickly capture screenshots of your desktop as well as photos from your webcam. Today’s screenshot tool does not take advantage of your webcam, but provides you with some really interesting capturing modes. In addition to the regular 3 modes of area, window and full screen, Neox Screen allows you to capture images in different shapes such as Rounded Rectangle, Ellipse, Triangle, Diamond, Polygon and Free Hand. The image is not locally saved by default, and is directly uploaded to an online image sharing service of your choice from several options available. You can also upload local images, text and files directly to different websites and share them with others using an automatically-shortened URL.
The application runs in the system tray and can be brought up by double-clicking its icon. The top toolbar lets you access most of the app’s features including Clipboard Upload, File Upload, Capture, Destinations, History and Settings.

You can choose any capturing mode by selecting it from the list or hitting its hotkey. Next, drag your mouse to select the required capture area in the form of the selected shape. For instance in the screenshot below, I selected the Diamond mode from the list. As soon as you capture an image, it is automatically uploaded to the selected service.

The Destinations button allows you to select the default websites for uploading the images, text files and any other files from various available options that include most popular image, text and file sharing services. You can also choose a URL shortener service from several popular options, to quickly share links of your uploaded files and screenshots with others.

Furthermore, you can select the Configuration options from the Destinations menu to tweak individual settings for each service in the list. There are various public and private hosting services available such as TinyPro, Imgur, Flickr, Photobucket, TwitPic and a lot more; just select the one you want from the list and enter the required details to set up the account.

The History dialog box lets you search the previously uploaded images using date, file name, file type and host filters. You can then copy or open the URL of the required image to share it or save it to your computer.

The Settings dialog box allows you to tweak a plethora of options for the app, organized under General, Upload, Hotkeys, Image, Clippboard upload, Capture, History, Proxy and Debug tabs.

Neox is one of the most feature-filled screenshot capturing apps we’ve seen so far, but it lacks a very basic option of directly saving the captured image to your computer without having to upload them online first. Neox Screen works on both 32-bit and 64-bit versions of Windows XP, Windows Vista, Windows 7 and Windows 8.
Download Neox Screen
The application runs in the system tray and can be brought up by double-clicking its icon. The top toolbar lets you access most of the app’s features including Clipboard Upload, File Upload, Capture, Destinations, History and Settings.
You can choose any capturing mode by selecting it from the list or hitting its hotkey. Next, drag your mouse to select the required capture area in the form of the selected shape. For instance in the screenshot below, I selected the Diamond mode from the list. As soon as you capture an image, it is automatically uploaded to the selected service.
The Destinations button allows you to select the default websites for uploading the images, text files and any other files from various available options that include most popular image, text and file sharing services. You can also choose a URL shortener service from several popular options, to quickly share links of your uploaded files and screenshots with others.
Furthermore, you can select the Configuration options from the Destinations menu to tweak individual settings for each service in the list. There are various public and private hosting services available such as TinyPro, Imgur, Flickr, Photobucket, TwitPic and a lot more; just select the one you want from the list and enter the required details to set up the account.
The History dialog box lets you search the previously uploaded images using date, file name, file type and host filters. You can then copy or open the URL of the required image to share it or save it to your computer.
The Settings dialog box allows you to tweak a plethora of options for the app, organized under General, Upload, Hotkeys, Image, Clippboard upload, Capture, History, Proxy and Debug tabs.
Neox is one of the most feature-filled screenshot capturing apps we’ve seen so far, but it lacks a very basic option of directly saving the captured image to your computer without having to upload them online first. Neox Screen works on both 32-bit and 64-bit versions of Windows XP, Windows Vista, Windows 7 and Windows 8.
Download Neox Screen

Tinuous Is A Powerful Batch Image Editor With Support For Plug ins
At first glance, Tinuous may seem to be just another image conversion app, but the tool offers some impressive image processing power under the hood. The software is designed to perform batch conversion of image files. This comes useful in instances when you don’t have time to convert each image file individually. It allows you to resize and rename images, adjust image quality, alter dimensions, change brightness, contrast, saturation and hue, and modify some other aspects of the images. The application supports most major image formats, including JPEG, GIF, PNG, BMP, TIFF and more. Keep reading for more details.
A very useful feature of the tool is the directory tree pane on the left, making the process of browsing for files stored anywhere on your computer both quick and intuitive. You just have to expand the directory to reveal further subdirectories, and then drag the required directories to the Input Folder or Output folder boxes to instantly set the directory as source or destination folder for the images.
Tinuous packs in various photo tweaking options under its three tabs named General, Individual and Advanced. Additionally, you can change a few application specific settings under the Options tab, and setup third-party plugins under the Plug-ins tab. The General tab houses a multitude of image alteration settings. You can specify the formats to be converted under the Input drop down menu, which is useful if you have many types of image files present in the folder but want to process only a particular type such as JPEG. Likewise, you can specify the output format. The Save Settings section to the right changes dynamically according to the selected output format. For JPEG, you can increase or reduce image quality, change sampling ratio, shrink width or height, rotate the image or sharpen edges (Low, Med, High). Similarly, you get the appropriate settings for other file types such as PNG, BMP, TIFF etc.

You’re only allowed to select a whole directory as source location, but you can manually select specific images from that directory to work on under the Individual tab. Simply mark the images that you want to convert under the Input Files list, and the rest of the images that are left unmarked will be skipped by the process.

The Advanced tab allows you to further tweak the conversion settings. It enables you to change the Bit depth of the output files, as well as toggle dithering, progressive, transparent color, exif copy and interlace modes. You can also add your comments to the file. While there aren’t any advanced effects to apply, the basic brightness, contrast, saturation and hue controls can come handy to manually tweak an otherwise bland image.

The Options tab houses some generic settings, allowing you to specify the default input and output folders, add an entry for Tinuous under the ‘Send To’ context menu for quick conversion right from Windows Explorer, and toggle a few other miscellaneous parameters.

Tinuous is a robust image converter that does its job exceptionally well, making it one of best tools of its kind around. The app works on Windows XP, Windows Vista, Windows 7 and Windows 8.
Download Tinuous
A very useful feature of the tool is the directory tree pane on the left, making the process of browsing for files stored anywhere on your computer both quick and intuitive. You just have to expand the directory to reveal further subdirectories, and then drag the required directories to the Input Folder or Output folder boxes to instantly set the directory as source or destination folder for the images.
Tinuous packs in various photo tweaking options under its three tabs named General, Individual and Advanced. Additionally, you can change a few application specific settings under the Options tab, and setup third-party plugins under the Plug-ins tab. The General tab houses a multitude of image alteration settings. You can specify the formats to be converted under the Input drop down menu, which is useful if you have many types of image files present in the folder but want to process only a particular type such as JPEG. Likewise, you can specify the output format. The Save Settings section to the right changes dynamically according to the selected output format. For JPEG, you can increase or reduce image quality, change sampling ratio, shrink width or height, rotate the image or sharpen edges (Low, Med, High). Similarly, you get the appropriate settings for other file types such as PNG, BMP, TIFF etc.
You’re only allowed to select a whole directory as source location, but you can manually select specific images from that directory to work on under the Individual tab. Simply mark the images that you want to convert under the Input Files list, and the rest of the images that are left unmarked will be skipped by the process.
The Advanced tab allows you to further tweak the conversion settings. It enables you to change the Bit depth of the output files, as well as toggle dithering, progressive, transparent color, exif copy and interlace modes. You can also add your comments to the file. While there aren’t any advanced effects to apply, the basic brightness, contrast, saturation and hue controls can come handy to manually tweak an otherwise bland image.
The Options tab houses some generic settings, allowing you to specify the default input and output folders, add an entry for Tinuous under the ‘Send To’ context menu for quick conversion right from Windows Explorer, and toggle a few other miscellaneous parameters.
Tinuous is a robust image converter that does its job exceptionally well, making it one of best tools of its kind around. The app works on Windows XP, Windows Vista, Windows 7 and Windows 8.
Download Tinuous
Create Your Own Real Time Video Effects With Videosis For iPhone
Photo and video editing apps usually have a lot of filters, but at times you might feel like none of them fits your needs perfectly. There are many apps that let users create their own effects, but that can be a bit too time-consuming and even intimidating for relatively inexperienced users. Videosis is a new iOS app that has a nice collection of predefined video filters and effects, and in addition, lets you easily create your own by simply combining available effects and changing their values. Videosis offers real-time filters, some of which even react to the sound around you.


Videosis offers a tutorial when it is launched for the first time but even if it is skipped, you can always rerun it from the app’s settings area. The same menu has options for toggling the shutter sound and controlling the ‘capture photo on-the-fly’ feature.
Before you begin shooting, choose the filter you want to apply to the camera. Hit the ‘FX’ button and up comes the list of all the predefined effects. Videosis has more than 40 filters, and you can apply any of them to the video with a single tap. If you want even more effects, hit the ‘+’ button available at the start of the list. New filters can be created by toggling on different effects or altering their values using the provided sliders. Some of the editing options even let you control the camera flash, and this becomes part of the filter. Once you are satisfied with your creation, start shooting or save the effect for future use by giving it a name. User-created filters appear at the very beginning of the effects list.


Videosis supports both front and allows you to rear cams, and the camera LED can be toggled with a single tap too. In order to capture an image while shooting, hit the small camera icon located in the bottom-right corner.
According to a warning from the Videosis developer, the app requires a lot of processing power and might not work smoothly on devices older than iPhone 4S (although we have to say that it was only slightly laggy on our iPhone 4). The app is available as a free and universal download. You can grab Videosis from the iTunes App Store using the link given below.
Download Videosis For iOS
Videosis offers a tutorial when it is launched for the first time but even if it is skipped, you can always rerun it from the app’s settings area. The same menu has options for toggling the shutter sound and controlling the ‘capture photo on-the-fly’ feature.
Before you begin shooting, choose the filter you want to apply to the camera. Hit the ‘FX’ button and up comes the list of all the predefined effects. Videosis has more than 40 filters, and you can apply any of them to the video with a single tap. If you want even more effects, hit the ‘+’ button available at the start of the list. New filters can be created by toggling on different effects or altering their values using the provided sliders. Some of the editing options even let you control the camera flash, and this becomes part of the filter. Once you are satisfied with your creation, start shooting or save the effect for future use by giving it a name. User-created filters appear at the very beginning of the effects list.
Videosis supports both front and allows you to rear cams, and the camera LED can be toggled with a single tap too. In order to capture an image while shooting, hit the small camera icon located in the bottom-right corner.
According to a warning from the Videosis developer, the app requires a lot of processing power and might not work smoothly on devices older than iPhone 4S (although we have to say that it was only slightly laggy on our iPhone 4). The app is available as a free and universal download. You can grab Videosis from the iTunes App Store using the link given below.
Download Videosis For iOS
Set Reminders For Unreplied Emails In Gmail With Notifus For Chrome
Emails are one of the first things we attend to when we start work in the morning, but reading all the new emails for the day isn’t the only thing one has to do; answering emails and following up on previous ones is important too, and that’s often difficult because there’s always so much to follow up on. Notifus is a Chrome extension that acts as an alarm clock for unanswered emails. When you compose an important email or one intended for someone who is highly unlikely to get back to you on time without sufficient nagging, you set a reminder for the email. The alarm can be set for a minimum of 1 day and a maximum of any number of days. Repeat reminders can be set at the time of sending the email as well.
Notifus adds six buttons to the Compose email view, one each for setting a reminder for 1-6 days and one for adding a custom number of days. The buttons act as send buttons too, so click them only after you have composed, proofread and added attachments to your message. To set repeated alerts, click the “Send & 1D” button. The alerts notify you if the email hasn’t been replied to at the end of the time you’ve set, i.e., if you email someone on December 24, 2012, and set a two day alert, the extension will notify you of the pending reply on December 26, 2012. If you’ve already received a reply, the alert will deactivate on its own.

The first time you use Notifus, you will be asked to authenticate your account and create a password for it. It takes less than a minute, since your email address is already there.

Once set, Notifus shows a timer when a message is open. You can remove the alert you’ve set by clicking the cross that appears next to it.

Notifus is useful but needs improvement. At present, alerts and timers show up only when you have a particular message open, and not when you are in the inbox view. The logic behind it that you shouldn’t have to worry about these messages since even if you archive them, the alerts will actively keep track of them. Despite that, some users might prefer to have a cursory look at how many of their emails have not been unanswered. The alert is a good backup in case you forget about an email, but knowing just which tasks are still pending would be a huge help. The alerts can only be set in number of days; adding support for specifying the time would also be great. Overall, Notifus is good to have around as a safety net. Do note that it currently does not work on the new Gmail compose view.
Install Notifus For Chrome
Notifus adds six buttons to the Compose email view, one each for setting a reminder for 1-6 days and one for adding a custom number of days. The buttons act as send buttons too, so click them only after you have composed, proofread and added attachments to your message. To set repeated alerts, click the “Send & 1D” button. The alerts notify you if the email hasn’t been replied to at the end of the time you’ve set, i.e., if you email someone on December 24, 2012, and set a two day alert, the extension will notify you of the pending reply on December 26, 2012. If you’ve already received a reply, the alert will deactivate on its own.
The first time you use Notifus, you will be asked to authenticate your account and create a password for it. It takes less than a minute, since your email address is already there.
Once set, Notifus shows a timer when a message is open. You can remove the alert you’ve set by clicking the cross that appears next to it.
Notifus is useful but needs improvement. At present, alerts and timers show up only when you have a particular message open, and not when you are in the inbox view. The logic behind it that you shouldn’t have to worry about these messages since even if you archive them, the alerts will actively keep track of them. Despite that, some users might prefer to have a cursory look at how many of their emails have not been unanswered. The alert is a good backup in case you forget about an email, but knowing just which tasks are still pending would be a huge help. The alerts can only be set in number of days; adding support for specifying the time would also be great. Overall, Notifus is good to have around as a safety net. Do note that it currently does not work on the new Gmail compose view.
Install Notifus For Chrome
Sound resolve with problems
When youre turning to multimedia applications, either music or video. And apparently the computer does not make a sound at all. You can check for problems like this from the software and the haardwarenya. For checking of the software, you can check the sound driver is installed properly or not. You can also check through Device Manager and Sound and Audio Device Properties in the following ways:
 Through Device Manager
1) Click [Start] > Right click [My Computer] and select [Properties].
2) In the System Properties, click the Hardware tab and click Device Manager.
3) In the Device Manager page, click 2 times on the Sound, video and game controllesand see if the sound deriver name already exists.
4) If there is a question mark, that sign was damaged and the sound driver you must install the correct sound driver again.
5) If the driver looks sound, click 2 times the name of the sound driver to look like the picture beside.
6) See page Realtek High Definition Audio Properties, because the sound card is realtek and be sure to use the Device Usage in the option Use this device (enable).
Through Sound and Audio Device Properties
1) If the above are correct and the way the sound still does not come out,
2) it is likely you have more than one sound card (it has onboard sound card and an external sound card).
3) It could be one of the sound card is damaged and you do not change the device settings are used.
4) Well, this is worth checking thesound and audio device properties which can be accessed through the following steps.
5) Click on Start and select Control Panel.
6) On the control panel, click Sounds, Speech And Audio Devices. To display the classic control panel just click the Sounds And Audio Devices.
1) If the above are correct and the way the sound still does not come out,
2) it is likely you have more than one sound card (it has onboard sound card and an external sound card).
3) It could be one of the sound card is damaged and you do not change the device settings are used.
4) Well, this is worth checking thesound and audio device properties which can be accessed through the following steps.
5) Click on Start and select Control Panel.
6) On the control panel, click Sounds, Speech And Audio Devices. To display the classic control panel just click the Sounds And Audio Devices.
Iphone Error Collection With Solution
iTunes: Advanced iTunes Store troubleshooting. This article will guide you through advanced troubleshooting for iTunes Store connectivity.
Important: If you have not done so already, you should first review Cant connect to iTunes Store and iTunes: Possible iTunes Store errors before proceeding with the steps in this article.
Errors -9815
Set exact date, restart computer. See also Apples KB article.
Errors -9814
Set exact date, restart computer. See also Apples KB article.
Errors -9800
Set exact date, restart computer. See also Apples KB article.
Error -50
Delete Storm Vedio, QuickTime, iTunes, then reinstall iTunes. See also Apples KB article.
Error -35
See Apples KB article.
Error 1
Unable to downgrade. Try changing the USB port (the back one of chassis is better) and restart computer.
The installed version of iTunes may also be too old. Update iTunes.
Error 2
Sn0wbreeze 1.6 Custom Firmware has a ASR patch problem. Use sn0wbreeze 1.7 or PwnageTool. Device isnt bootable.
Error 6
Not enter the downgrading mode, change USB port (the back one of chassis is better) and restart computer.
Error 9
Searching correct fault.
Error 10
LLB is missing from the IPSW. The device cannot be booted up. The trick to skip the baseband update no longer works.
Error 11
Removed bbfw file in the firmware folder of an unzipped IPSW.
Error 13
Occurs when you want to install a beta firmware with iTunes for Windows (actively blocked by Apple; beta users are developers and therefore must have a Mac).
Error 13 may also signify a USB problem. Check the USB connection and try other direct ports or maybe the USB cable is an older one. Device isnt bootable.
Error 14
Custom firmware update fail (PwnageTool). You have to restore the device with a custom firmware. Update to a custom firmware isnt working. Device isnt bootable. 2
USB Problem. Check the USB connection and try other direct ports or maybe the USB cable is an older one. Device isnt bootable.
Error 17
Custom firmware update fail (sn0wbreeze). You have to restore the device with a custom firmware. Update to a custom firmware isnt working. 2
Error 20
Searching correct fault.
Error 23
Baseband Communication error (Hardware), Most probably Baseband chip is faulty.
Error 26
False version of the NOR flash firmware. Use the correct sn0wbreeze version.
Error 28
Searching correct fault.
Error 29
See Apple discussions thread about this problem.
Error 37
iPod touch 2G LLB patched with the 0x24000 Segment Overflow was used on an iPhone 3GS custom firmware. Known on damaged bundles from unofficial PwnageTool distributions or bundles.
Error 1002
Are you restoring to a stock apple firmware or a custom pwn firmware? Either way make sure you are in DFU mode first.
Error 1004
This is caused by a failure to match the Baseband Nonce currently in memory to the Nonce returned in the BasebandFirmware SHSH blob. This is a normal part of iPhone 4 local restores via TinyUmbrella. 1
Error 1013
Restart computer; change computer; reinstall system, if iPhone is always in restoring mode: XP users can jump from restoring mode with ibus; MAC users can use iNdependence. (usually on the iPhone with 1.0.2 firmware downgraded from 1.1.1)
Error 1014
This error is down to itunes not liking your USB ports on your computer. Use a different USB slot or a different computer if possible. That is the easiest fix!
Error 1015
Restart computer; change computer; reinstall system, if iPhone is always in restoring mode: XP users can jump from restoring mode with ibus; MAC users can use iNdependence. (usually on the iPhone with 1.1.1 firmware downgraded from 1.1.2) Baseband firmware on the IPSW is higher than the baseband firmware on the iPad/iPhone. 1
Error 1413
Restart computer; change USB port; reinstall system. See also Apples KB article.
Error 1415
Restart computer; change USB port; reinstall system.
Error 1417
Restart computer; change USB port; reinstall system.
Error 1418
Restart computer; change USB port; reinstall system.
Error 1428
Restart computer; change USB port; reinstall system.
Error 1600
Custom firmware cant be restored on a device with DFU Mode. Use Recovery Mode.
Error 1602
Restart computer; change computer; reinstall system.
Error 1603
False kernelcache patch. Known on damaged bundles from unofficial PwnageTool distributions or bundles. See also Apple KB article
Error 1604
Device was not pwned (signature checks were not blocked). Custom firmware cant be restored.
Error 1611
iTunes tried to enter the Restore Mode, but the device turned back to the Recovery Mode.
Error 1619
iTunes is too old and couldnt read the iPhone in Recovery or DFU Mode. Please update iTunes and try it again.
Error 1644
IPSW was moved during prepare with iTunes. Try it again and dont move the IPSW.
Error 2002
iTunes cant connect because another program is using it or its disconnected during the Apple Server check.
Error 3XXX
iTunes cant connect to gs.apple.com. Maybe Port 80 and Port 443 is blocked. Open it on your router.
Error 3002
Update to an older firmware isnt working, because Apple is no longer handing out SHSHs for the device/firmware combination.
Error 3004
No internet connection during the firmware restore.
Error 3014
False edited hosts. The SHSH request couldnt be completed. No connection to the Apple Server, Sauriks Server or localhost.
Error 3194
Occurs when trying to install an old firmware and Apples server disallows the installation. The only solution is to have SHSH backup and modify the hosts file to point to Sauriks Cydia server where they are backed up (or localhost if you have it yourself).
Error 3195
"An internal error occurred." Missing SHSH for the firmware. Maybe the same as "This device isnt eligible for the request build." but with an cache error.
Error 11222
internet options Connections tab Click LAN Settings uncheck "use a proxy server"
0xE8000022
Searching..........
0xE800003D
False permissions in the Carrier Bundle folder. Restore, update or fix the permissions from the carrier bundle to update the carrier settings via iTunes.
0xE800006B
Device was suddenly unplugged. iTunes couldnt connect with the device. Try it again.
0xE8000065
sn0wbreeze custom cirmware error on USB connection. Unplug the device, reboot it, and plug it in again.
ReadMore detail...
Important: If you have not done so already, you should first review Cant connect to iTunes Store and iTunes: Possible iTunes Store errors before proceeding with the steps in this article.
- Mac OS X and Windows: For best results accessing the iTunes Store on your computer, update to the latest version of iTunes.
- iPhone, iPad, and iPod touch: For best results accessing the iTunes Store on your iPhone, iPad, or iPod, be sure your iOS is up to date.
Errors -9815
Set exact date, restart computer. See also Apples KB article.
Errors -9814
Set exact date, restart computer. See also Apples KB article.
Errors -9800
Set exact date, restart computer. See also Apples KB article.
Error -50
Delete Storm Vedio, QuickTime, iTunes, then reinstall iTunes. See also Apples KB article.
Error -35
See Apples KB article.
Error 1
Unable to downgrade. Try changing the USB port (the back one of chassis is better) and restart computer.
The installed version of iTunes may also be too old. Update iTunes.
Error 2
Sn0wbreeze 1.6 Custom Firmware has a ASR patch problem. Use sn0wbreeze 1.7 or PwnageTool. Device isnt bootable.
Error 6
Not enter the downgrading mode, change USB port (the back one of chassis is better) and restart computer.
Error 9
Searching correct fault.
Error 10
LLB is missing from the IPSW. The device cannot be booted up. The trick to skip the baseband update no longer works.
Error 11
Removed bbfw file in the firmware folder of an unzipped IPSW.
Error 13
Occurs when you want to install a beta firmware with iTunes for Windows (actively blocked by Apple; beta users are developers and therefore must have a Mac).
Error 13 may also signify a USB problem. Check the USB connection and try other direct ports or maybe the USB cable is an older one. Device isnt bootable.
Error 14
Custom firmware update fail (PwnageTool). You have to restore the device with a custom firmware. Update to a custom firmware isnt working. Device isnt bootable. 2
USB Problem. Check the USB connection and try other direct ports or maybe the USB cable is an older one. Device isnt bootable.
Error 17
Custom firmware update fail (sn0wbreeze). You have to restore the device with a custom firmware. Update to a custom firmware isnt working. 2
Error 20
Searching correct fault.
Error 23
Baseband Communication error (Hardware), Most probably Baseband chip is faulty.
Error 26
False version of the NOR flash firmware. Use the correct sn0wbreeze version.
Error 28
Searching correct fault.
Error 29
See Apple discussions thread about this problem.
Error 37
iPod touch 2G LLB patched with the 0x24000 Segment Overflow was used on an iPhone 3GS custom firmware. Known on damaged bundles from unofficial PwnageTool distributions or bundles.
Error 1002
Are you restoring to a stock apple firmware or a custom pwn firmware? Either way make sure you are in DFU mode first.
Error 1004
This is caused by a failure to match the Baseband Nonce currently in memory to the Nonce returned in the BasebandFirmware SHSH blob. This is a normal part of iPhone 4 local restores via TinyUmbrella. 1
Error 1013
Restart computer; change computer; reinstall system, if iPhone is always in restoring mode: XP users can jump from restoring mode with ibus; MAC users can use iNdependence. (usually on the iPhone with 1.0.2 firmware downgraded from 1.1.1)
Error 1014
This error is down to itunes not liking your USB ports on your computer. Use a different USB slot or a different computer if possible. That is the easiest fix!
Error 1015
Restart computer; change computer; reinstall system, if iPhone is always in restoring mode: XP users can jump from restoring mode with ibus; MAC users can use iNdependence. (usually on the iPhone with 1.1.1 firmware downgraded from 1.1.2) Baseband firmware on the IPSW is higher than the baseband firmware on the iPad/iPhone. 1
Error 1413
Restart computer; change USB port; reinstall system. See also Apples KB article.
Error 1415
Restart computer; change USB port; reinstall system.
Error 1417
Restart computer; change USB port; reinstall system.
Error 1418
Restart computer; change USB port; reinstall system.
Error 1428
Restart computer; change USB port; reinstall system.
Error 1600
Custom firmware cant be restored on a device with DFU Mode. Use Recovery Mode.
Error 1602
Restart computer; change computer; reinstall system.
Error 1603
False kernelcache patch. Known on damaged bundles from unofficial PwnageTool distributions or bundles. See also Apple KB article
Error 1604
Device was not pwned (signature checks were not blocked). Custom firmware cant be restored.
Error 1611
iTunes tried to enter the Restore Mode, but the device turned back to the Recovery Mode.
Error 1619
iTunes is too old and couldnt read the iPhone in Recovery or DFU Mode. Please update iTunes and try it again.
Error 1644
IPSW was moved during prepare with iTunes. Try it again and dont move the IPSW.
Error 2002
iTunes cant connect because another program is using it or its disconnected during the Apple Server check.
Error 3XXX
iTunes cant connect to gs.apple.com. Maybe Port 80 and Port 443 is blocked. Open it on your router.
Error 3002
Update to an older firmware isnt working, because Apple is no longer handing out SHSHs for the device/firmware combination.
Error 3004
No internet connection during the firmware restore.
Error 3014
False edited hosts. The SHSH request couldnt be completed. No connection to the Apple Server, Sauriks Server or localhost.
Error 3194
Occurs when trying to install an old firmware and Apples server disallows the installation. The only solution is to have SHSH backup and modify the hosts file to point to Sauriks Cydia server where they are backed up (or localhost if you have it yourself).
Error 3195
"An internal error occurred." Missing SHSH for the firmware. Maybe the same as "This device isnt eligible for the request build." but with an cache error.
Error 11222
internet options Connections tab Click LAN Settings uncheck "use a proxy server"
0xE8000022
Searching..........
0xE800003D
False permissions in the Carrier Bundle folder. Restore, update or fix the permissions from the carrier bundle to update the carrier settings via iTunes.
0xE800006B
Device was suddenly unplugged. iTunes couldnt connect with the device. Try it again.
0xE8000065
sn0wbreeze custom cirmware error on USB connection. Unplug the device, reboot it, and plug it in again.
How To Hard Reset Wave 2 with Lost Password
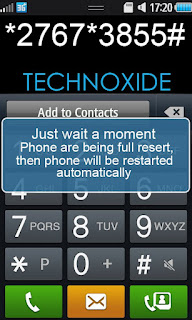
I am tested it with Samsung Wave 2 on Bada 1.2 and Bada 2.0 and its successfully reset to the default one. It may be work with other Bada OS phones.
* Before hard reset your phone must be charged to a minimum of 60%
Steps:
1. Backup your contacts
2. Remove SIM and Memmory Card
3. Now dial *2767*3855# and wait till the phone reboots.
Thats it ! Done ! Now your phone will be in default state !
How to Use PowerPoint Word Excel on iPhone With CloudOn
How to Use PowerPoint, Word, Excel on iPhone With CloudOn:
 For many people, one of the most important features that an iPhone and other iOS devices still lacks is native support for Office documents, namely, Word, Excel and PowerPoint. Surprisingly, Microsoft has announced that it will bring the popular productivity suite to iOS devices sometime next year.
However, there are a few excellent alternatives in the App Store that we have showed you already, like Google Drive and Dropbox. Even so, what these apps offer are more like workarounds and not a direct way to interact with your Office documents.
Thankfully though, CloudOn solves that with an app that allows you to access, create and edit all your Office documents on the go, and does so while integrating with other services so everything is kept up to date.
Here’s is a quick look at how CloudOn works.
Upon opening the app you will be greeted with a short, but useful demo showcasing the app’s most important features. Once within the app, you are presented with your accounts’ panel, where you can access all of your documents from some of the most important online services, including Dropbox, Google Drive, Box and SkyDrive.


Once you start navigating each of the services within the app (Dropbox in this case), you will feel right at home with the interface, since CloudOn follows how files are organized on each of them.


Note: While CloudOn is powerful enough to handle most Office documents, I found it odd that it wouldn’t recognize some simple .TXT files.
Of course, CloudOn is not about opening simple text files, so I immediately tried it out with some quite heavy Excel spreadsheets and Word documents.
Working with spreadsheets on CloudOn turned out to be like walking with shoes among dunes, which means that it was mostly pleasant but with a few annoyances here and there. On the positive side, CloudOn had no trouble opening even the most data-heavy spreadsheets that I threw at it. However, scrolling through them brought memories of some of the worst web apps that I’ve tried on the iPhone. I have an iPhone 4S, which is no slouch but still, navigating through my spreadsheets felt slow.

CloudOn almost instantly makes up for it however, with the variety of editing options that it offers for you to tweak and work with your spreadsheets. It doesn’t offer the full array of Microsoft Excel’s editing tools but what was there worked well and was far more than anyone editing spreadsheets from a smartphone should need.


The experience while working with Word documents was slightly better, with my documents not lagging that much when scrolling through them and with the variety of editing tools offered being on par with what was offered for spreadsheets.


Syncing also worked as expected, with every edit that I made on my documents updating almost instantly on my Dropbox folder.


Besides the normal document editing tools, CloudOn also offers you the ability to create both folders and documents from the ground up, all of which worked without problems in my tests. When working with photo files though, I noticed that not all of them showed well on more than one occasion, which must surely be caused due to a glitch or bug in the app that needs fixing.

One last important feature that I almost forgot to mention about CloudOn is its Recent Files option, which shows the most recent files you’ve worked with, saving lots of time that would otherwise be spent browsing and searching for them.

Via Guidingtech
How to Use PowerPoint, Word, Excel on iPhone With CloudOn
- Tweet
For many people, one of the most important features that an iPhone and other iOS devices still lacks is native support for Office documents, namely, Word, Excel and PowerPoint. Surprisingly, Microsoft has announced that it will bring the popular productivity suite to iOS devices sometime next year.However, there are a few excellent alternatives in the App Store that we have showed you already, like Google Drive and Dropbox. Even so, what these apps offer are more like workarounds and not a direct way to interact with your Office documents.
Thankfully though, CloudOn solves that with an app that allows you to access, create and edit all your Office documents on the go, and does so while integrating with other services so everything is kept up to date.
Here’s is a quick look at how CloudOn works.
Upon opening the app you will be greeted with a short, but useful demo showcasing the app’s most important features. Once within the app, you are presented with your accounts’ panel, where you can access all of your documents from some of the most important online services, including Dropbox, Google Drive, Box and SkyDrive.
Once you start navigating each of the services within the app (Dropbox in this case), you will feel right at home with the interface, since CloudOn follows how files are organized on each of them.
Note: While CloudOn is powerful enough to handle most Office documents, I found it odd that it wouldn’t recognize some simple .TXT files.
Of course, CloudOn is not about opening simple text files, so I immediately tried it out with some quite heavy Excel spreadsheets and Word documents.
Working with spreadsheets on CloudOn turned out to be like walking with shoes among dunes, which means that it was mostly pleasant but with a few annoyances here and there. On the positive side, CloudOn had no trouble opening even the most data-heavy spreadsheets that I threw at it. However, scrolling through them brought memories of some of the worst web apps that I’ve tried on the iPhone. I have an iPhone 4S, which is no slouch but still, navigating through my spreadsheets felt slow.
CloudOn almost instantly makes up for it however, with the variety of editing options that it offers for you to tweak and work with your spreadsheets. It doesn’t offer the full array of Microsoft Excel’s editing tools but what was there worked well and was far more than anyone editing spreadsheets from a smartphone should need.
The experience while working with Word documents was slightly better, with my documents not lagging that much when scrolling through them and with the variety of editing tools offered being on par with what was offered for spreadsheets.
Syncing also worked as expected, with every edit that I made on my documents updating almost instantly on my Dropbox folder.
Besides the normal document editing tools, CloudOn also offers you the ability to create both folders and documents from the ground up, all of which worked without problems in my tests. When working with photo files though, I noticed that not all of them showed well on more than one occasion, which must surely be caused due to a glitch or bug in the app that needs fixing.
One last important feature that I almost forgot to mention about CloudOn is its Recent Files option, which shows the most recent files you’ve worked with, saving lots of time that would otherwise be spent browsing and searching for them.
Conclusions
It is true that in less than a year Microsoft will finally offer a set of native iOS Office apps, yet in my case I really don’t see the need for them. Office has become a tool needed mostly by companies and by those who create complex documents. For everyone else, options like CloudOn (and other inexpensive productivity tools on the App Store) offer great functionality for free.Via Guidingtech
Get Your News On Your iPhone With the 2 Best Free iOS News Readers
 If there is something that has changed radically in the past few years with the advent of new technologies is the way we consume news. News media has migrated from being delivered almost exclusively via TV, radio and newspapers to being consumed by many people via the web.
This tendency has increased dramatically with the boom of smartphones and tablets, doing together to print news what email did to traditional “snail” mail years ago.
However, while nowadays most people get their news via Facebook, Twitter and other similar online social networking services, these are more like “digested” or “summarized” news, which rarely elaborate or provide depth.
If you use news readers though, you know that you can get and consume your news on your iPhone in a way that resembles the more “traditional” methods, providing you with much deeper and better news articles. The problem is that news reader apps tend to be paid apps (at least the good ones used to be), but it wasn’t until recently that some noteworthy, free alternatives became available for the iPhone, iPad and iPod Touch.
Let’s take a look at the two best of them.
What Exactly are News Feeds and Readers?
Despite every news site sporting its own Facebook and Twitter accounts, most, if not all relevant news channels still offer news feeds and RSS channels to which one can easily subscribe to using a service like Google Reader, which gathers all the news from the news’ sources that you like.
Important Information: News feeds and RSS channels are streamlined versions of news created specifically for reader to subscribe using news reader services. If you have a Google account, you already have what you need to start subscribing to some RSS feeds. Head over to Google Reader to learn more.
2 Best News Readers for iOS


Its interface is very simple and intuitive, with users needing only to “flip” through articles to scan across them. That said, it is not the most efficient reader due to its interface, since it doesn’t show as many news as other alternatives on one screen.


Feedly
Our other alternative is Feedly, a more recent contender in the news reader space that offers a more traditional interface, but keeping things still a bit fresh with some original navigations elements. Feedly also syncs with your Google Reader account, making it fairly easy to pull your news from Google’s service to read in the app.

Navigation within the app is ok, although you might need to adjust some settings in order to tailor it to your liking.


Conclusions
In both cases these apps allow you to save articles for later reading either within the apps themselves or through popular read-later services like Instapaper and Pocket (which we compared in this article).
This puts them on par even with paid news readers and makes them very important alternatives for anyone who likes to read news the way their writers intended. Make sure to check out both apps, since they offer very different experiences, which gives you even more to choose from. And best of all? You get all these choices at no cost!
Via Guidingtech
Subscribe to:
Posts (Atom)