Showing posts with label screen. Show all posts
Showing posts with label screen. Show all posts
Neox Screen Is A Great Screenshot Tool With Several Upload Options Unique Capture Modes
Neox Screen Is A Great Screenshot Tool With Several Upload Options & Unique Capture Modes:

ReadMore detail...
While Windows offers its own screenshot utility in form of Snipping Tool, the features it offers are simply not enough for the needs of bloggers and power users who need good quality screenshots often. We have seen countless third party screenshot tools that attempt to differentiate themselves from each other by offering different capturing modes, output formats, editing options and file saving functionality. Recently, we covered EzSnap that let you quickly capture screenshots of your desktop as well as photos from your webcam. Today’s screenshot tool does not take advantage of your webcam, but provides you with some really interesting capturing modes. In addition to the regular 3 modes of area, window and full screen, Neox Screen allows you to capture images in different shapes such as Rounded Rectangle, Ellipse, Triangle, Diamond, Polygon and Free Hand. The image is not locally saved by default, and is directly uploaded to an online image sharing service of your choice from several options available. You can also upload local images, text and files directly to different websites and share them with others using an automatically-shortened URL.
The application runs in the system tray and can be brought up by double-clicking its icon. The top toolbar lets you access most of the app’s features including Clipboard Upload, File Upload, Capture, Destinations, History and Settings.

You can choose any capturing mode by selecting it from the list or hitting its hotkey. Next, drag your mouse to select the required capture area in the form of the selected shape. For instance in the screenshot below, I selected the Diamond mode from the list. As soon as you capture an image, it is automatically uploaded to the selected service.

The Destinations button allows you to select the default websites for uploading the images, text files and any other files from various available options that include most popular image, text and file sharing services. You can also choose a URL shortener service from several popular options, to quickly share links of your uploaded files and screenshots with others.

Furthermore, you can select the Configuration options from the Destinations menu to tweak individual settings for each service in the list. There are various public and private hosting services available such as TinyPro, Imgur, Flickr, Photobucket, TwitPic and a lot more; just select the one you want from the list and enter the required details to set up the account.

The History dialog box lets you search the previously uploaded images using date, file name, file type and host filters. You can then copy or open the URL of the required image to share it or save it to your computer.

The Settings dialog box allows you to tweak a plethora of options for the app, organized under General, Upload, Hotkeys, Image, Clippboard upload, Capture, History, Proxy and Debug tabs.

Neox is one of the most feature-filled screenshot capturing apps we’ve seen so far, but it lacks a very basic option of directly saving the captured image to your computer without having to upload them online first. Neox Screen works on both 32-bit and 64-bit versions of Windows XP, Windows Vista, Windows 7 and Windows 8.
Download Neox Screen
The application runs in the system tray and can be brought up by double-clicking its icon. The top toolbar lets you access most of the app’s features including Clipboard Upload, File Upload, Capture, Destinations, History and Settings.
You can choose any capturing mode by selecting it from the list or hitting its hotkey. Next, drag your mouse to select the required capture area in the form of the selected shape. For instance in the screenshot below, I selected the Diamond mode from the list. As soon as you capture an image, it is automatically uploaded to the selected service.
The Destinations button allows you to select the default websites for uploading the images, text files and any other files from various available options that include most popular image, text and file sharing services. You can also choose a URL shortener service from several popular options, to quickly share links of your uploaded files and screenshots with others.
Furthermore, you can select the Configuration options from the Destinations menu to tweak individual settings for each service in the list. There are various public and private hosting services available such as TinyPro, Imgur, Flickr, Photobucket, TwitPic and a lot more; just select the one you want from the list and enter the required details to set up the account.
The History dialog box lets you search the previously uploaded images using date, file name, file type and host filters. You can then copy or open the URL of the required image to share it or save it to your computer.
The Settings dialog box allows you to tweak a plethora of options for the app, organized under General, Upload, Hotkeys, Image, Clippboard upload, Capture, History, Proxy and Debug tabs.
Neox is one of the most feature-filled screenshot capturing apps we’ve seen so far, but it lacks a very basic option of directly saving the captured image to your computer without having to upload them online first. Neox Screen works on both 32-bit and 64-bit versions of Windows XP, Windows Vista, Windows 7 and Windows 8.
Download Neox Screen

Get Galaxy Note II Style Smart Screen Rotation On Any Android Device
Get Galaxy Note II Style Smart Screen Rotation On Any Android Device:
The Galaxy Note II by Samsung brought along with it a pretty useful feature in Smart Rotation – an alternative Android screen rotation mechanism that relies on facial recognition instead of the accelerometer to switch between screen orientations. The feature utilizes your device’s front facing camera to determine your facial orientation, and controls the screen orientation accordingly. So far, the feature was exclusively available to a select few Galaxy series devices including Note II, S II & S III, but thanks to the efforts of XDA member StupidIdea and his colleague, we now have GMD Smart Rotate – an awesome Android app that brings the Note II-style Smart Rotation feature along with various other goodies to any rooted or non-rooted device running Android 2.3 Gingerbread or above. As evident from the above description, the app is meant to work only on Android devices that sport a front-facing camera.
GMD Smart Rotate is available in the Play Store as both free and $1.89 variant. The paid version offers a couple of additional interesting features such as the SGS3 style Smart Stay to keep your device’s screen awake for as long as you keep looking at it, and the options to hide the app’s notification bar icon and specify custom rotation preferences on an individual per-app basis for multiple apps. The free version has a limitation of allowing you to personalize rotation settings for just a single app at any given instance.


Besides replicating the Smart Rotation feature, the free version of the app lets you ‘Force Rotate’ any app to the preferred orientation. Using this option, you can use your favorite apps in an orientation that they may not support by default in the first place. For instance, I successfully managed to rotate the home screen of my non-rooted Nexus 4 to landscape mode with GMD Smart Rotate. In addition, you have the option to lock the screen orientation for the currently opened app. Thus you can keep using an app in portrait or landscape mode only, regardless of your device’s actual screen orientation preferences.
That’s not all – the app even supports a highly customizable home screen widget (or rather, switch) that lets you perform the following actions with a tap:


The app’s controls can be brought up from anywhere within the entire OS by using the GMD Smart Rotate notification panel icon. Using the app’s compact control panel overlay, you can toggle the smart rotate feature, lock currently selected orientation, enable force rotate for the currently opened app, and apply current settings as default for that particular app. Do note that the ‘Force rotate’ option on the control panel should be kept enabled for the app to work effectively in most scenarios. From the app’s settings screen, you can also enable toast notifications to get instant confirmation of successful face recognition and screen rotation.

With the app relying heavily on your device’s front facing camera to trigger screen orientation via the Smart Rotate feature, you might be worried about the battery being drained fairly quickly. Luckily, that’s not the case, because the app is supposed to trigger the camera only when it detects a substantial change in orientation based on the accelerometer. Quite understandably, the app might not work as desired in places where light is inadequate for the front facing camera to detect your face properly. Therefore, make sure that you use the app in a well-lit place.
All in all, it’s a pretty handy tool, especially for avid gamers, readers and movie buffs who hate being disturbed by frequent screen orientation shifts caused due to the slightest of movements.
Download GMD Smart Rotate For Android
Get GMD Smart Rotate Full Version Unlock Key
[via XDA-Developers]
Via Addictivetips
GMD Smart Rotate is available in the Play Store as both free and $1.89 variant. The paid version offers a couple of additional interesting features such as the SGS3 style Smart Stay to keep your device’s screen awake for as long as you keep looking at it, and the options to hide the app’s notification bar icon and specify custom rotation preferences on an individual per-app basis for multiple apps. The free version has a limitation of allowing you to personalize rotation settings for just a single app at any given instance.
Besides replicating the Smart Rotation feature, the free version of the app lets you ‘Force Rotate’ any app to the preferred orientation. Using this option, you can use your favorite apps in an orientation that they may not support by default in the first place. For instance, I successfully managed to rotate the home screen of my non-rooted Nexus 4 to landscape mode with GMD Smart Rotate. In addition, you have the option to lock the screen orientation for the currently opened app. Thus you can keep using an app in portrait or landscape mode only, regardless of your device’s actual screen orientation preferences.
That’s not all – the app even supports a highly customizable home screen widget (or rather, switch) that lets you perform the following actions with a tap:
- Custom rotation selection
- Toggle the Smart Rotate feature (default or forced)
- Switch to portrait mode (default or forced)
- Switch to reverse portrait mode
- Switch to landscape mode (default or forced)
- Switch to reverse landscape mode
- Rotate screen clockwise or counterclockwise
- Toggle auto rotate
The app’s controls can be brought up from anywhere within the entire OS by using the GMD Smart Rotate notification panel icon. Using the app’s compact control panel overlay, you can toggle the smart rotate feature, lock currently selected orientation, enable force rotate for the currently opened app, and apply current settings as default for that particular app. Do note that the ‘Force rotate’ option on the control panel should be kept enabled for the app to work effectively in most scenarios. From the app’s settings screen, you can also enable toast notifications to get instant confirmation of successful face recognition and screen rotation.
With the app relying heavily on your device’s front facing camera to trigger screen orientation via the Smart Rotate feature, you might be worried about the battery being drained fairly quickly. Luckily, that’s not the case, because the app is supposed to trigger the camera only when it detects a substantial change in orientation based on the accelerometer. Quite understandably, the app might not work as desired in places where light is inadequate for the front facing camera to detect your face properly. Therefore, make sure that you use the app in a well-lit place.
All in all, it’s a pretty handy tool, especially for avid gamers, readers and movie buffs who hate being disturbed by frequent screen orientation shifts caused due to the slightest of movements.
Download GMD Smart Rotate For Android
Get GMD Smart Rotate Full Version Unlock Key
[via XDA-Developers]
Via Addictivetips
Take Screen Shot in Samsung Galaxy Ace Without Root
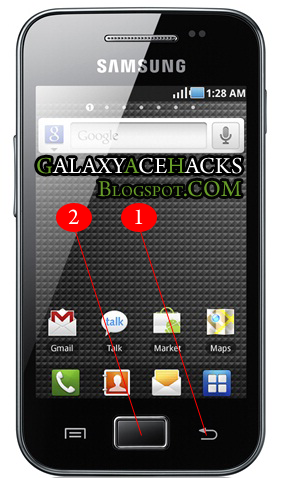
Capturing screen in Samsung Galaxy ace is so simple and achive this without using any third party application. To work this trick OS version Should be Android 2.3 GingerBread. If your OS version is 2.2 then upgrade it free.. if you have allready 2.3 then try it.
1. First press and hold the backbutton in your phone.
(marked in picure as 1)
2. Now Click your Home button and relese....
(marked in picture as 2)
If you here a capture sound and see a capture transition..Done...!!!
Now Goto your SD Card using any File browser ...will get a folder named "ScreenCapture" containing captured picture.
below is the picture captured using my Galaxy Ace GT-S5830 Android 2.3.4 GingerBread
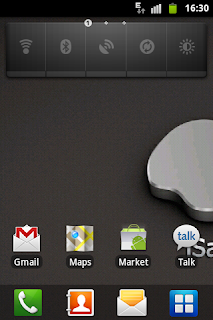
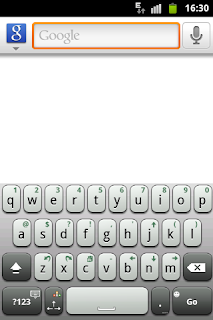
I am tested it with Galaxy ace v 2.3.4 and worked for me.
If this helped you please do a comment....if know any other way please share by comment.
How to Prevent Users from Uninstalling Apps from Start Screen in Windows 8
The Windows 8 start screen is probably one of the most important feature and there are many other features linked to it. One of the feature is the ability to uninstall metro apps easily from the start screen. Metro apps are the ones which are installed from Windows Store. But if your PC is used by other users, you might probably want to prevent others from uninstalling apps you have installed on your Windows 8. Although there is an option to prevent this using Group policy, this option is not available in all versions of Windows 8.
So in such cases, it is best to prevent uninstalling using the registry hack. Please note that, this trick involves editing the registry of Windows, do not attempt it if you are not sure on modifying registry. Also, take a backupof registry before editing it.
Open the registry using the Run command (Win + R) and type regedit and press enter. Now navigate to this key,HKEY_CURRENT_USERSoftwarePoliciesMicrosoftWindows
In the next step, you need to create a new Key Explorer under the Windows.

Now select this new key and create a new DWORD value NoUninstallFromStart under the Explorer key.

Enter the value for NoUninstallFromStart as 1. Now close the registry editor and log off Windows 8. Log in back and you can see the option to uninstall is removed from Windows 8.
So in such cases, it is best to prevent uninstalling using the registry hack. Please note that, this trick involves editing the registry of Windows, do not attempt it if you are not sure on modifying registry. Also, take a backupof registry before editing it.
Open the registry using the Run command (Win + R) and type regedit and press enter. Now navigate to this key,HKEY_CURRENT_USERSoftwarePoliciesMicrosoftWindows
In the next step, you need to create a new Key Explorer under the Windows.
Now select this new key and create a new DWORD value NoUninstallFromStart under the Explorer key.
Enter the value for NoUninstallFromStart as 1. Now close the registry editor and log off Windows 8. Log in back and you can see the option to uninstall is removed from Windows 8.
Subscribe to:
Posts (Atom)